Meta title: Photo Inside Snow Globe DIY for Kids
Meta description: Make a photo inside snow globe with simple STEM fun. Try this child-friendly guide and spark curious learning today.
Excerpt: Turn a rainy afternoon into a mini science mission with this cheerful guide to making a photo inside snow globe. Learn simple craft steps, explore viscosity and floating glitter, and create a keepsake children will love.
Rain tapping at the window. Scissors on the table. One child asking for a craft, another asking for a snack, and everyone hoping for a bit of magic.
That is when a photo inside snow globe activity feels brilliant.
It is part memory craft, part mini science experiment, and part storytelling adventure. Children get to see a favourite photo transformed into a tiny world they can shake, watch, and proudly display. Grown-ups get an activity that feels meaningful rather than messy for the sake of it.
It also helps that families and schools are actively looking for safe ideas like this. Forum data suggests significant interest in “photo snow globe craft kids”, with many questions about non-toxic materials compliant with safety regulations. This indicates a need for child-friendly guides that mix creativity with learning (100architects.com).
Turn a Dreary Day into a Dazzling Display
Some crafts keep children busy for ten minutes. This one gives them a story.
A child can become an astronaut in a sparkling jar. A class photo can turn into a winter scene. A picture from a museum trip can become a swirling memory globe. That is why this project works so well for STEM learning for kids. It starts with making, then naturally opens the door to questions.
Why does the glitter fall slowly? Why does the photo need protecting? Why do some liquids move differently from others?
Why children love this activity
Children enjoy seeing themselves at the centre of a creation. It gives the craft a personal hook.
For adults, it is handy because the finished globe can become a gift, a classroom display piece, or a calm-down object for a reading corner.
If you need more weather-proof inspiration, these indoor activities for rainy days fit alongside this idea.
Where people often get stuck
The confusing part is not the decorating. It is the practical side.
People often wonder:
- Which jar works best for a clear view
- How to stop the photo getting soggy
- What liquid to use so the glitter drifts nicely
- How to keep it safe for children helping with the project
Those questions matter. A good result comes from simple choices made early.
Tip: Treat this craft like a tiny mission. Gather the right materials first, then let the children do the fun design choices with confidence.
A photo snow globe also has a lovely classroom and home-learning bonus. It can connect art, observation, materials science, and speaking skills. Ask a child to describe their globe, explain their choices, or invent a story about the scene inside. Suddenly, one jar becomes a whole learning adventure.
Your Mission Briefing Gathering Your Supplies
The easiest way to enjoy this project is to set out your supplies like a launch checklist. Children love this part because it feels official. Adults love it because fewer surprises appear halfway through.
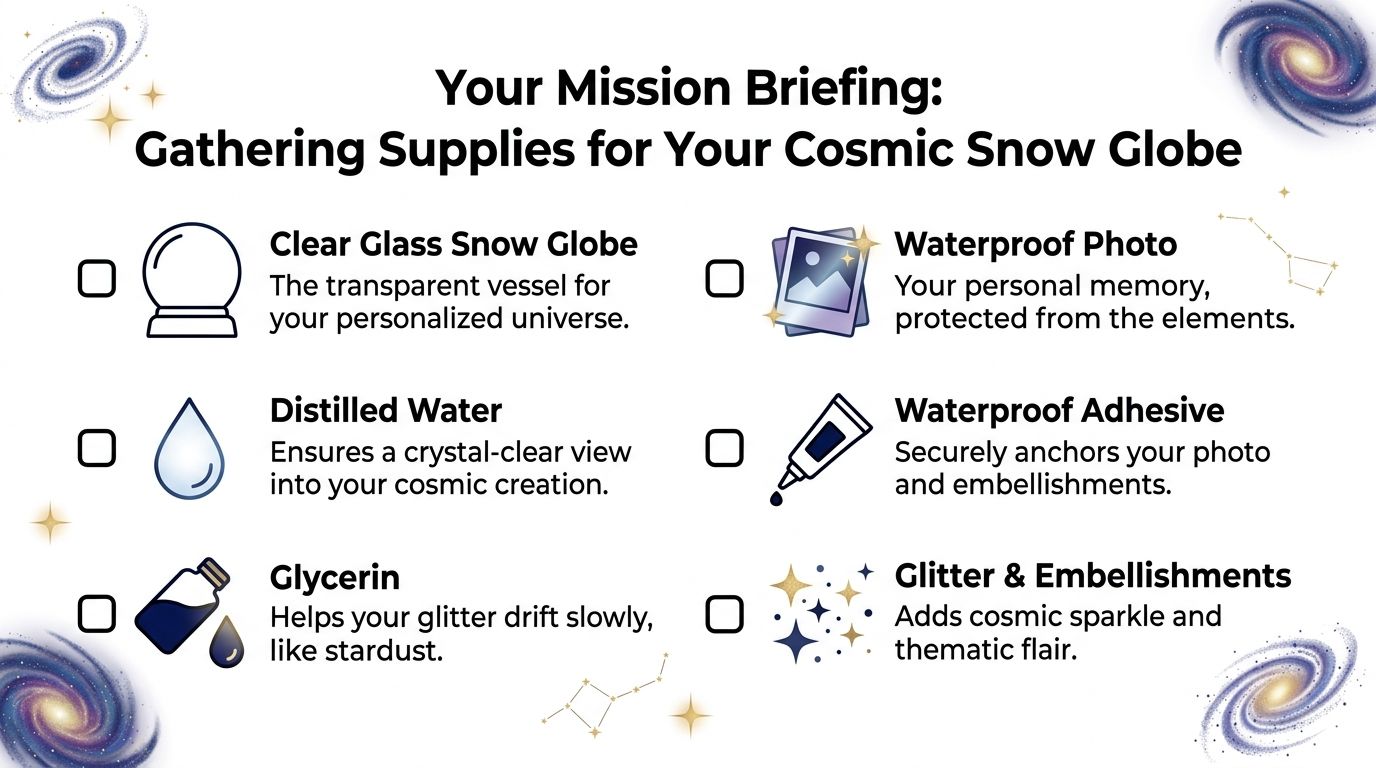
For the best results, use a 500ml glass jar and waterproof your photo with strong packing tape, which is often highly effective for submersion sealing. Using baby oil helps the glitter fall slowly, and Craft Council data reports an 85% success rate for DIY versions for children aged 6 to 12 using these simple materials (learn.corel.com).
Your supply table
| Item | Why it helps | Good to know |
|---|---|---|
| 500ml glass jar | Gives a clear view and enough room for the photo | A snug lid matters |
| Printed photo | The star of the globe | Choose a clear image with one main subject |
| Strong packing tape | Protects the photo from the liquid | Smooth it carefully to avoid trapped bubbles |
| Baby oil | Helps glitter drift more slowly | Useful for that classic snow globe effect |
| Fine glitter | Creates the “snow” | A little goes a long way |
| Glue | Secures the photo to the lid insert or base | Adults should handle hot glue |
| Scissors | For trimming the photo neatly | Small detail cuts make a big difference |
Why the liquid matters
Here, the science peeks in.
Plain water lets glitter drop quickly. A thicker liquid slows the movement, so children can watch the sparkle drift instead of sink at once. That slower movement makes the globe feel more magical and more dramatic.
If you want extra printable fun before you begin, explore the Free Activities page.
A simple prep routine
Try laying everything out in this order:
- Photo tools first. Printed picture, scissors, tape.
- Jar materials next. Jar, lid, glue.
- Finishing pieces last. Baby oil, glitter, decorations.
That order keeps the table organised and helps children focus on one job at a time.
Key takeaway: The best photo inside snow globe projects are usually the simplest ones. Clear jar, protected photo, slow-moving liquid, and just enough sparkle.
Preparing Your Photo for its Cosmic Journey
The photo is the heart of the whole project. If it looks good, the globe feels special straight away.
A busy background can make the inside of the jar look cluttered. A simple photo with one person, one pet, or one bold subject usually works best. Think clean outlines and cheerful expressions.
Pick the right kind of picture
Children often want their most exciting photo, but not every picture suits a jar.
These usually work well:
- Standing portraits with space around the person
- Costume photos such as astronauts, explorers, or winter adventurers
- School or library snapshots with a clear focal point
These can be trickier:
- Dark photos where details are hard to see
- Crowded group shots
- Images with lots of background clutter
A colouring extension can be fun too. If children want a more imaginative scene, these pictures for printing and colouring can inspire backgrounds, borders, or extra decorations around the globe.
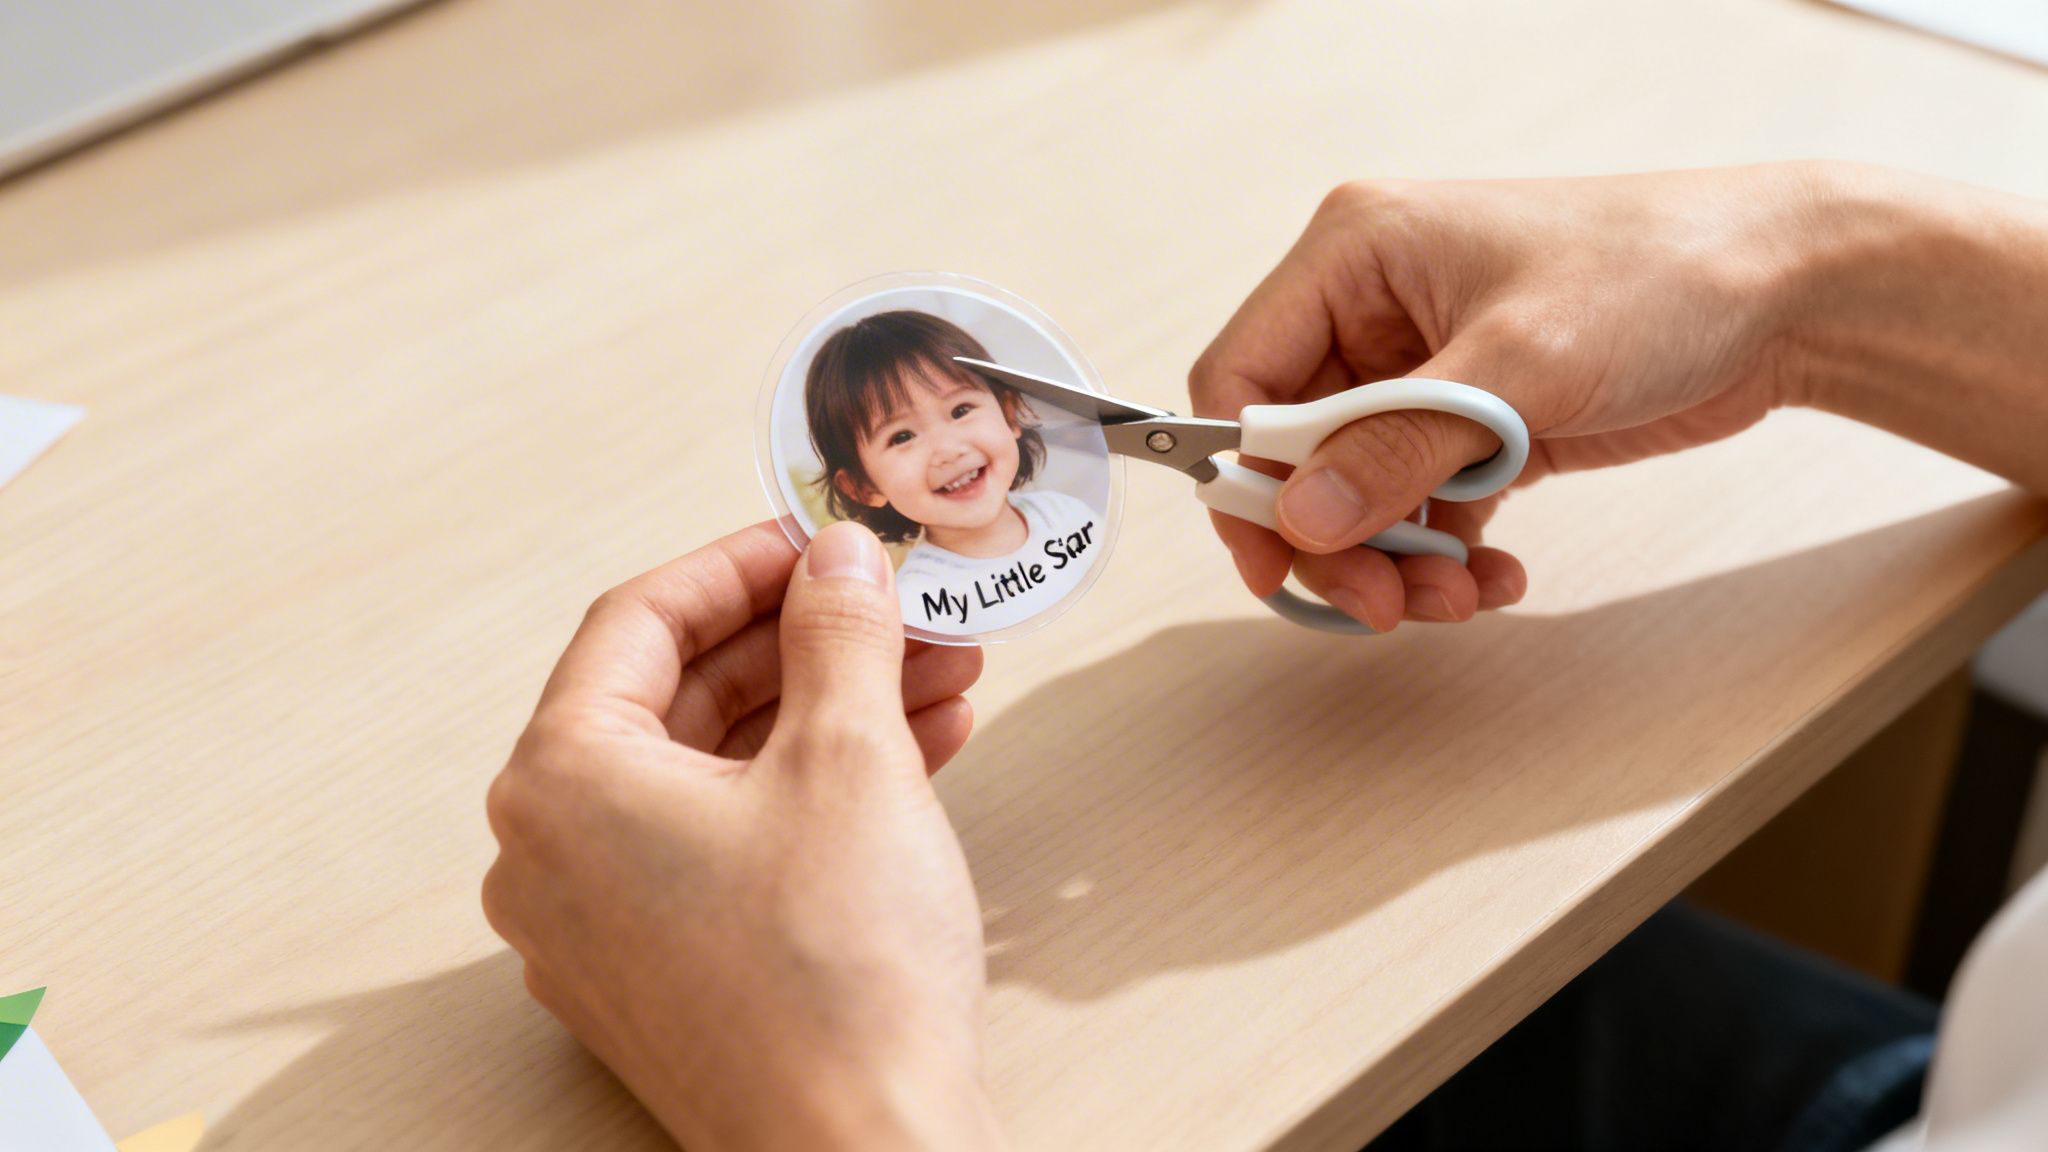
Cut and protect it carefully
Trim closely around the subject if you want the picture to stand out inside the liquid. Leave a small border if the child is still practising scissor control.
Then comes the most important job. Waterproofing.
Cover both sides with strong packing tape and press firmly so the edges seal well. Smooth from the centre outward to push air away.
Try this creative twist
Ask children one question before you cut:
“What mission is this photo from?”
Their answers are often wonderful. It might be “my moon landing”, “my ice planet rescue”, or “the day I found crystal caves”. That tiny storytelling moment gives the craft personality.
Tip: If the photo curls after taping, place it under a heavy book for a short while before assembly.
You do not need fancy editing tools to make this work. A neat trim, a clear subject, and good waterproofing do most of the heavy lifting.
Assembling Your Galactic Snow Globe
This is the moment children have been waiting for. The parts stop being separate objects and start becoming a tiny world.
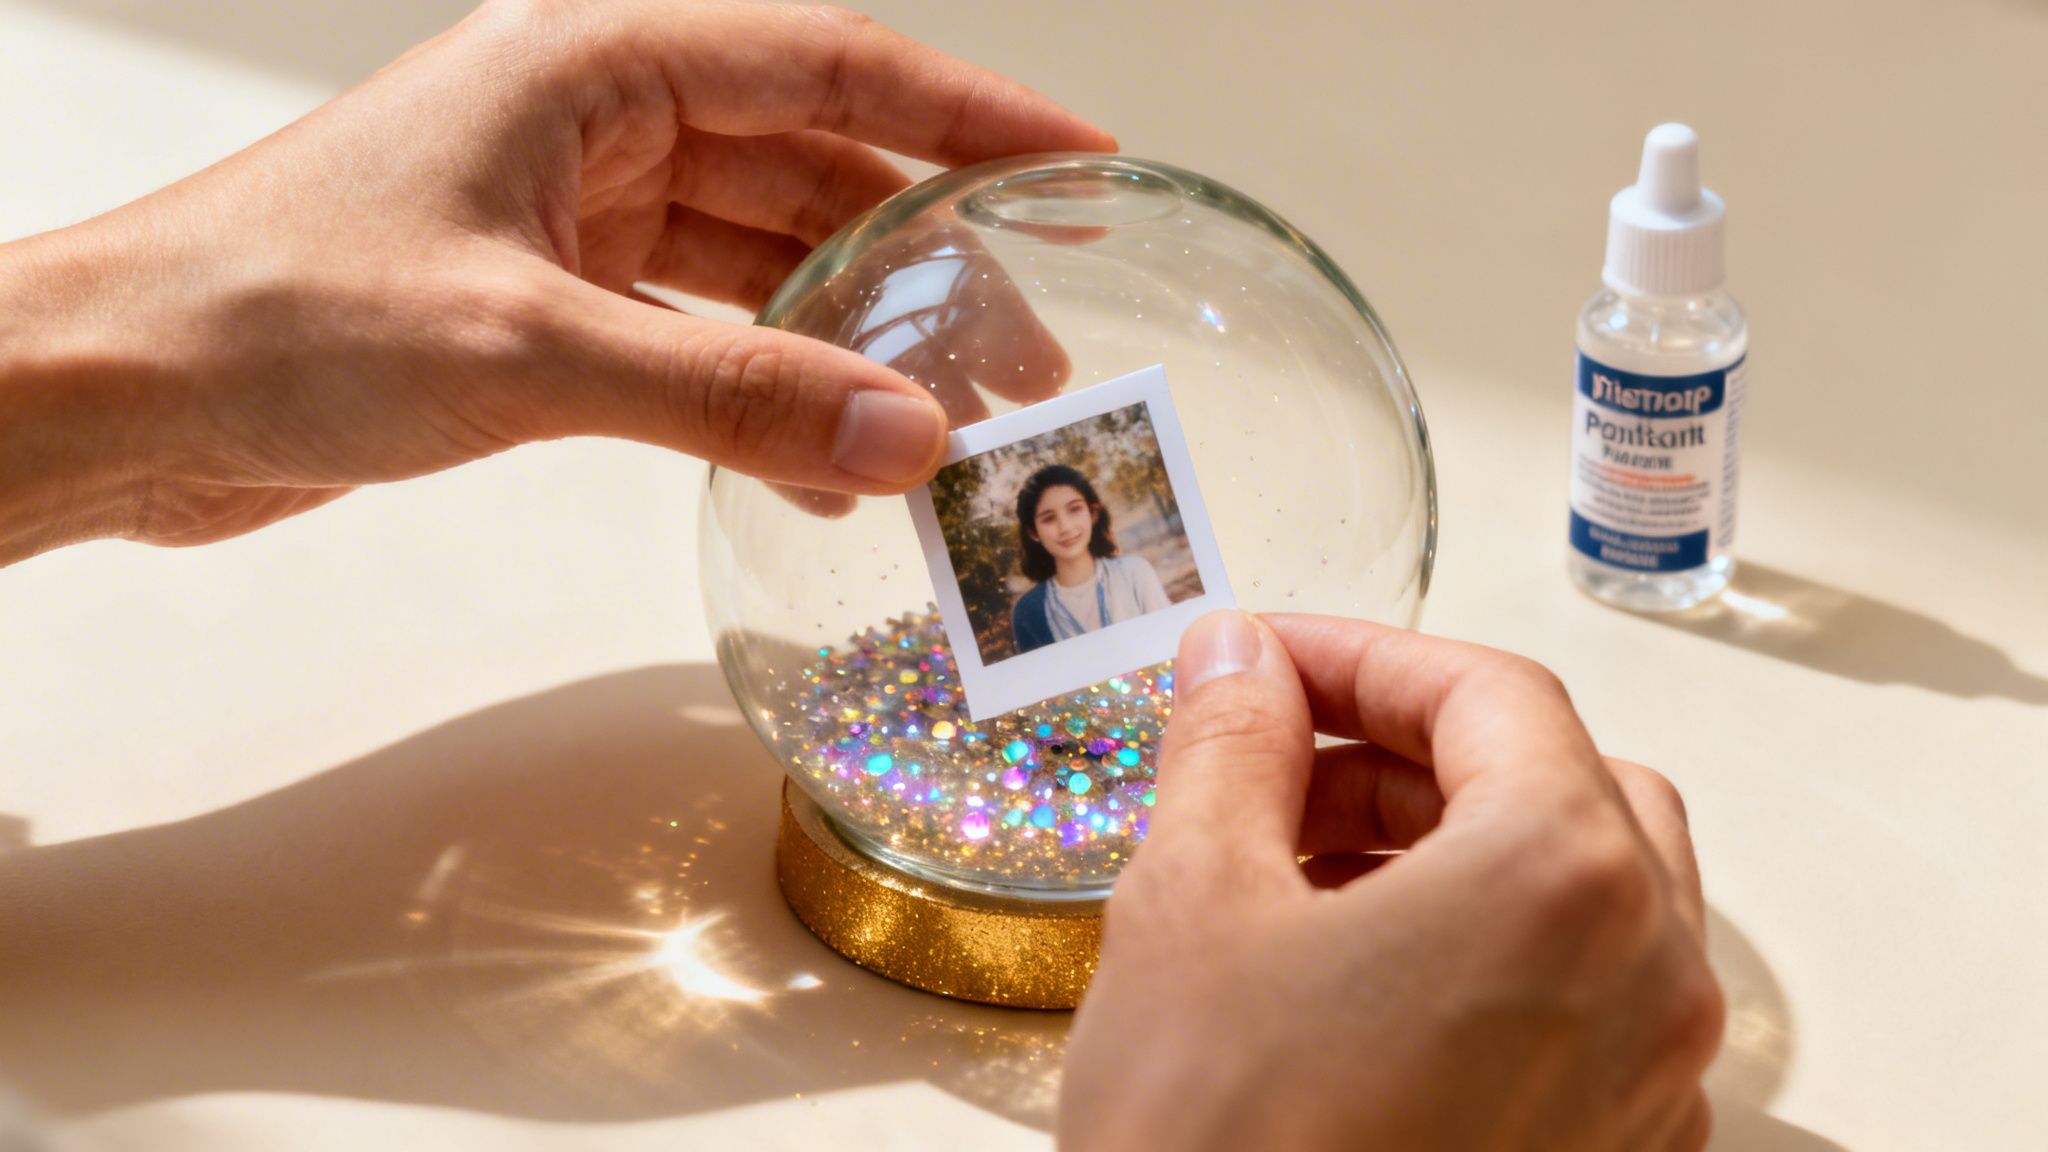
Start with the anchor point
Fix the prepared photo to the inside of the lid area or to a base piece that fits securely into the jar. Keep it upright and centred.
If you are using hot glue, this is the adult step. Children can watch, count down, and help check whether the picture is standing straight.
Then let the glue set fully before adding anything else. Rushing this part often causes wobbles later.
Add the sparkle slowly
Pour in the baby oil. Then add a small pinch of glitter.
Less is more here. Too much glitter can hide the photo, which defeats the point of making a personalised globe in the first place.
Children often want to tip in half the packet. I gently call this the “meteor storm temptation”.
The science hiding in the shimmer
The slow-floating effect is a perfect moment for space science crafts style learning.
The magic of a slow-drifting snow globe comes from viscosity, which means a fluid’s resistance to flow. Adding a few drops of glycerin or using baby oil increases viscosity, helping the glitter fall more slowly and gracefully than it would in plain water (NASA Space Place on viscosity).
That gives you a lovely question to ask children:
“Does the glitter zoom, drift, or float?”
They are observing real material behaviour, even if they think they are just making a sparkly keepsake.
For more hands-on printable making, these crafts you print pair well with this project.
Seal and test
Screw the lid on firmly. Wipe the outside. Then do a gentle turn, not a wild shake.
Look for:
- Leaking around the lid
- A photo that tilts or falls
- Too much glitter blocking the view
- Cloudiness from disturbed glue or debris
If all looks good, then the fun begins. Give it a proper swirl and watch the scene come alive.
A video can help children see the overall flow before they try it.
Talk like scientists while you craft
Try these sentence starters:
- I notice the glitter moves…
- I predict it will fall faster if…
- I changed the amount of glitter and now…
- I think the liquid is thicker because…
That language builds observation and explanation skills in a natural way.
Try This: Make two mini versions with different liquids and compare how the glitter behaves. Children love spotting which one feels more “spacey”.
A finished globe is not just pretty. It is a model for discussing floating, movement, visibility, and design choices.
Customise Your Creation with a Space Ranger Fred Theme
Once the globe is built, the imagination can really take off.
A plain jar is lovely, but themed details turn it into a story object. Children often stay engaged longer when they can invent a setting, a mission, or a character role for the photo inside.
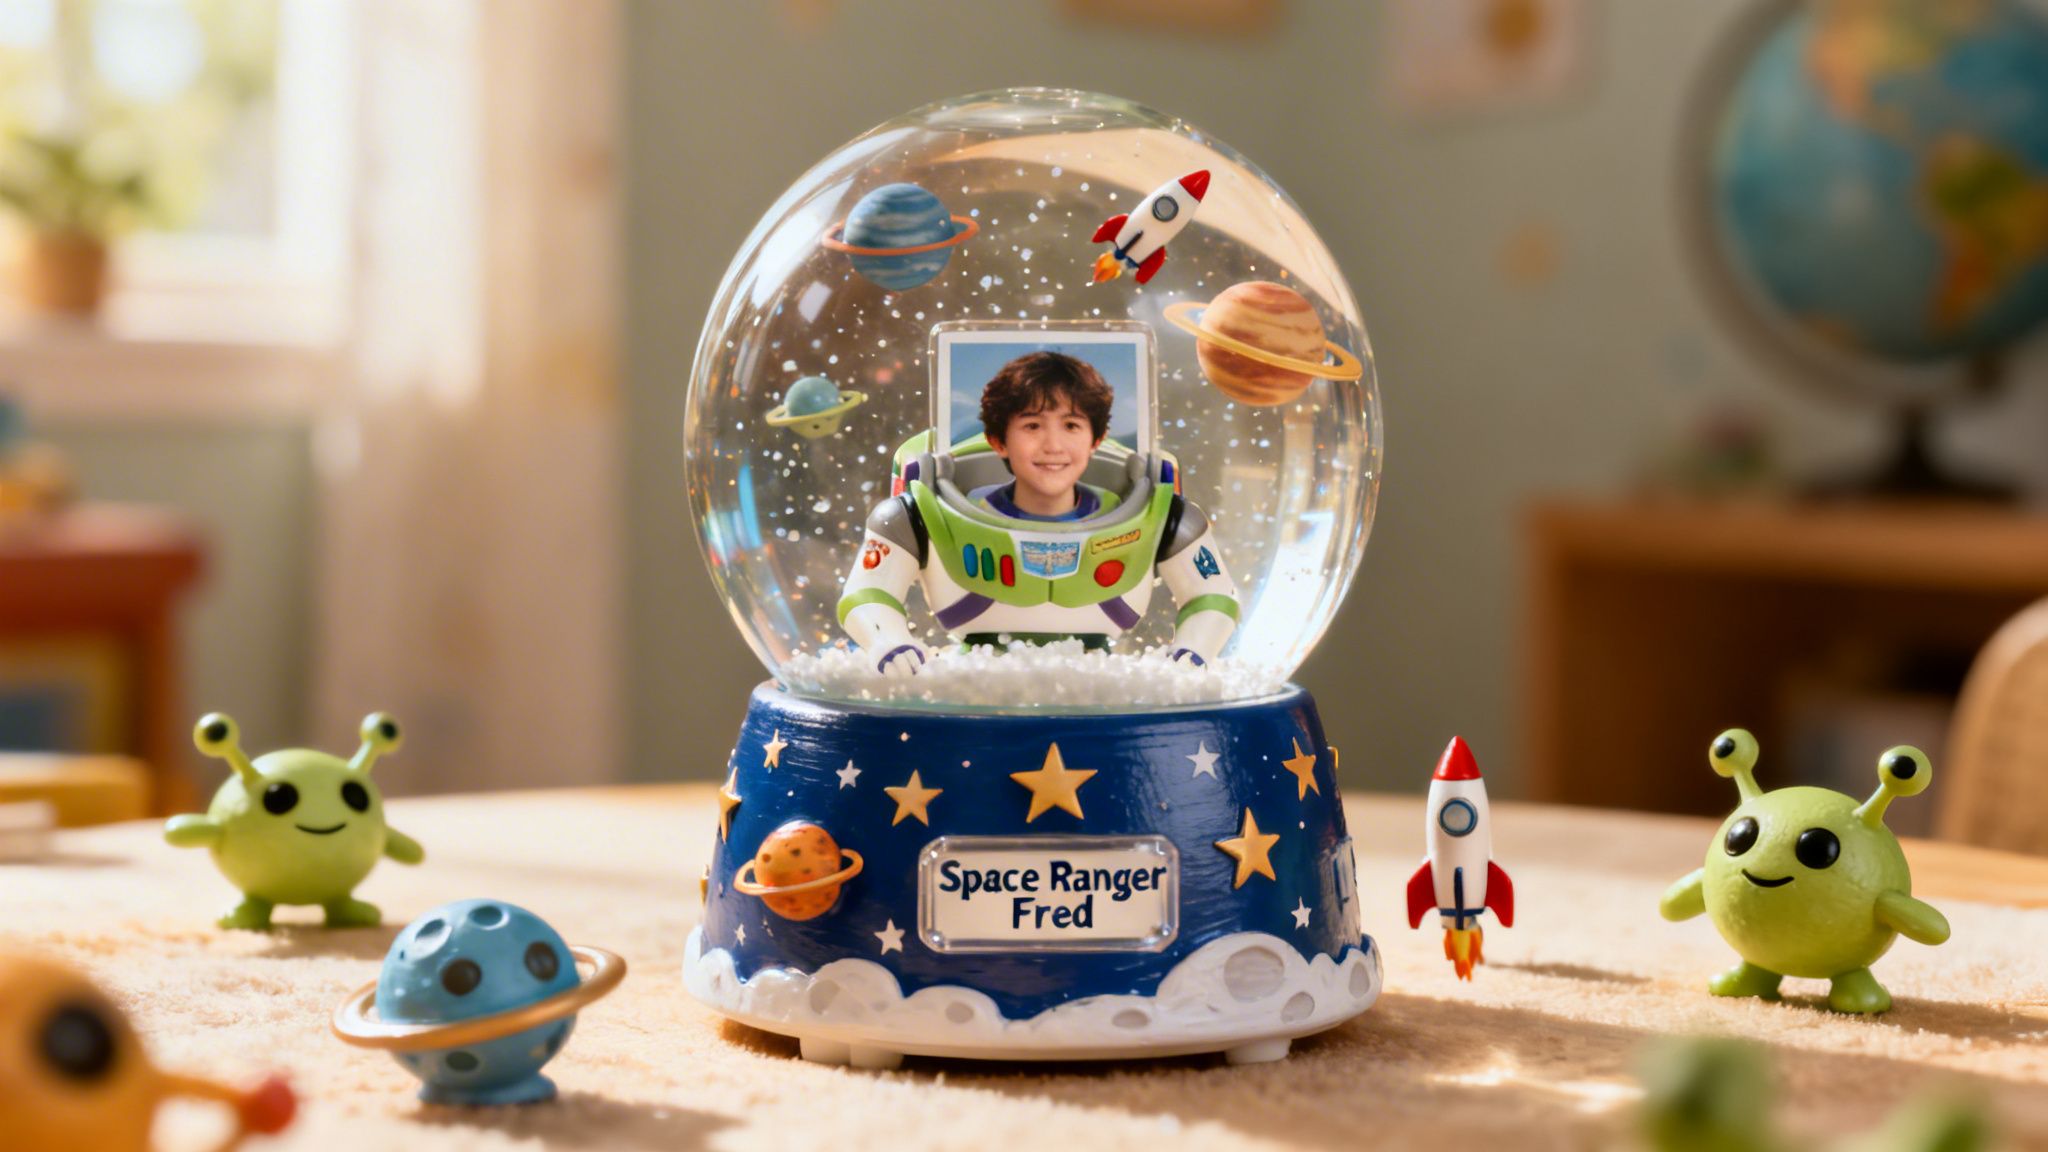
Theme ideas children enjoy
Here are a few favourites for kids craft ideas space projects:
Moon mission globe
Add silver stars, a grey lid, and a label with the name of the mission.Ice planet explorer
Use cool colours, tiny white sparkles, and a winter photo.Alien garden jar
Draw small planets or plants on paper and place them behind the photo.Rocket launch keepsake
Add a paper rocket on the outside of the jar and give the globe a launch date.
Small design choices that help
Children can decorate the lid with paint pens or paper circles. You can also add a title card underneath the jar, such as “Commander Maya’s Neptune Mission” or “Arun on Snow Planet Seven”.
If your child enjoys building stories around crafts, a book can spark that imaginative layer beautifully. You might enjoy our latest Space Ranger Fred book as a read-aloud companion before or after crafting.
Turn the craft into a speaking activity
Ask children to present their globe like museum curators or astronauts reporting back to Earth.
You could prompt them with:
- Where is this globe set?
- Who is inside it?
- What problem must they solve?
- What does the glitter represent?
That simple conversation turns craft time into language practice and confident sharing.
Troubleshooting and Alternative Adventures
Even cheerful craft missions sometimes hit a wobble. The good news is that most problems are easy to fix.
Quick fixes
The globe looks too cloudy
Empty it, rinse the jar, and try again with cleaner materials and less glitter.The photo bends or leans
Strengthen the base with a sturdier backing before gluing it in place.The lid leaks
Check the seal, wipe the rim, and tighten gently rather than forcing it.The glitter drops too fast
Swap to baby oil or add a thicker liquid option suitable for your chosen method.
If you need a simpler version
Not every family, class, or library session has time for a liquid-filled jar.
You can make a dry version instead using a clear plastic dome, a cut-out photo, and loose “snow” such as paper confetti. It still gives children the joy of creating a scene around their photograph, with less setup and less waiting.
That version works well for younger children or quick craft tables.
Your Cosmic Creation is Complete
You have made more than a decoration. You have helped a child build a memory, test an idea, and tell a story with their own hands.
A good photo inside snow globe project brings together art, science, and imagination in one bright little world. Keep it on a shelf, gift it to a grandparent, or use it as a talking point after a lesson. The best part is the feeling children get when they say, “I made that.”
Frequently Asked Questions
Can I use water instead of baby oil?
You can, but the glitter usually falls faster. If you want a slower, floaty effect, a thicker liquid works better.
What if I do not have a printer?
Use an existing printed photo, a photocopy, or a child’s drawing instead. The idea still works beautifully.
Is hot glue safe for children?
Hot glue is an adult job. Children can help with planning, cutting, choosing glitter, and decorating.
What kind of photo works best?
A clear picture with one main subject is easiest to see inside the jar.
Can I make this as a classroom activity?
Yes, but many teachers prefer a simpler dry version for larger groups because it is easier to manage and tidy.
If this little craft mission sparked some curiosity, you can explore more adventures at Space Ranger Fred. Have a peek at the books, download free printables, follow along on social media, and share your snow globe ideas with others. If you try this activity, do leave a comment and tell us what kind of world your young explorer created.