Ready to turn your kitchen table into a launchpad for cosmic creativity? With a few simple craft supplies like paper, paint, and maybe some polystyrene balls, you and your little explorer can paint the solar system and embark on an unforgettable journey through space. This guide is your mission control, perfect for young adventurers aged 6 to 12.
Launching Your Cosmic Painting Adventure
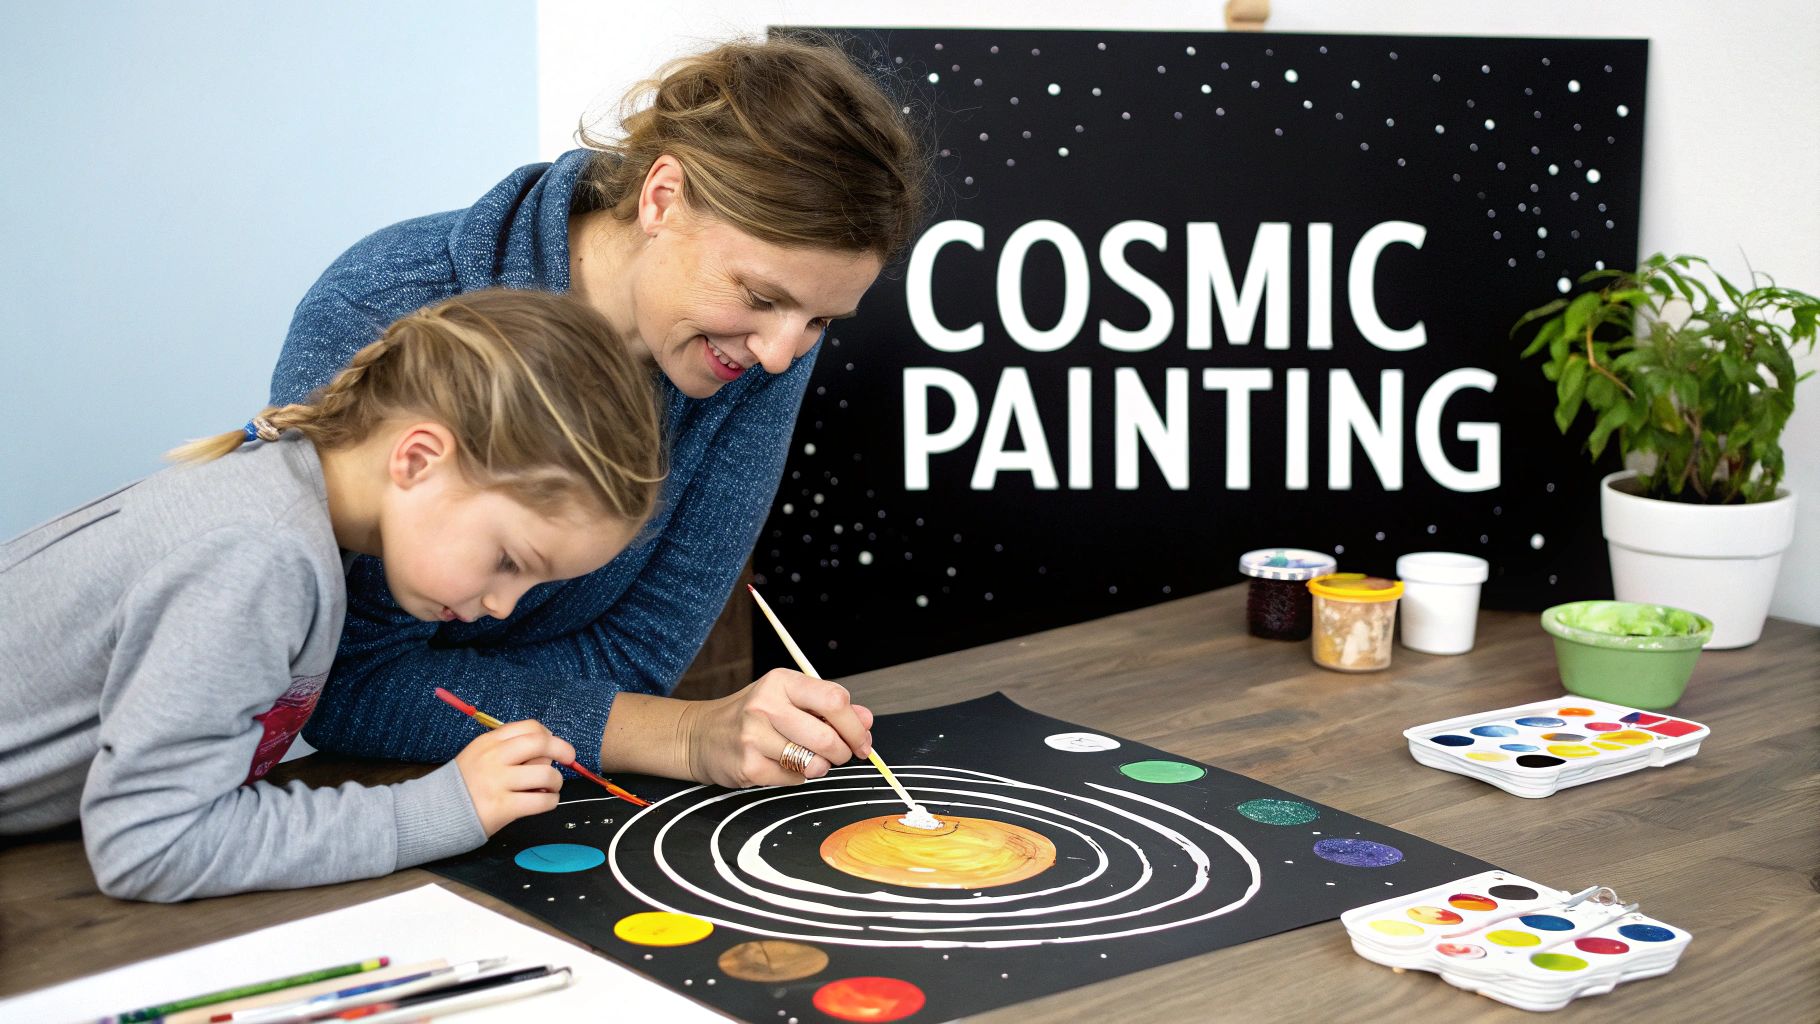
Let's bring the wonders of space to life, one planet at a time. Painting the solar system is so much more than a rainy-day activity; it's a mission to explore our galactic neighbourhood through imagination and messy, colourful fun. This isn't about creating a perfect scientific model. It’s about sparking curiosity, asking brilliant questions, and getting hands-on with the universe.
A project like this helps children connect with huge ideas in a way that feels playful and totally achievable. When they mix fiery reds for Mars or splatter a galaxy of stars across a dark background, they’re not just painting—they’re building their very own corner of the cosmos.
Along the way, they start to wonder about the big stuff:
- Planet Order and Size: Which one's the biggest? Which is closest to the Sun?
- Unique Features: Why does Saturn have those cool rings? What makes Jupiter look so stormy?
- Our Place in Space: Where’s our home, Planet Earth, in this vast system?
This guide will walk you through everything you need, from vibrant posters to amazing 3D planet models. For even more creative missions, check out our other solar system project ideas.
Connecting Art to the Real World
Thinking about our Sun as the glowing centre of the solar system gets you wondering about its power. Imagine zipping through space like Space Ranger Fred, but instead of just seeing stars, you're helping power your school with the Sun's energy!
It’s actually happening right here in the UK. A huge £180 million initiative is helping to install solar panels on hundreds of schools and hospitals. Right now, only about 20% of UK schools have them, but this amazing tech could slash energy bills by thousands each year. You can learn more about how schools are using solar power.
Gearing Up for Your Cosmic Creation
Every great space mission starts with the right kit. Before you and your little Space Rangers blast off into creating your cosmic masterpiece, let’s get all our gear in one place. Don't worry, you won’t need a trip to a NASA laboratory—most of this stuff can be found around the house or at a local craft shop.
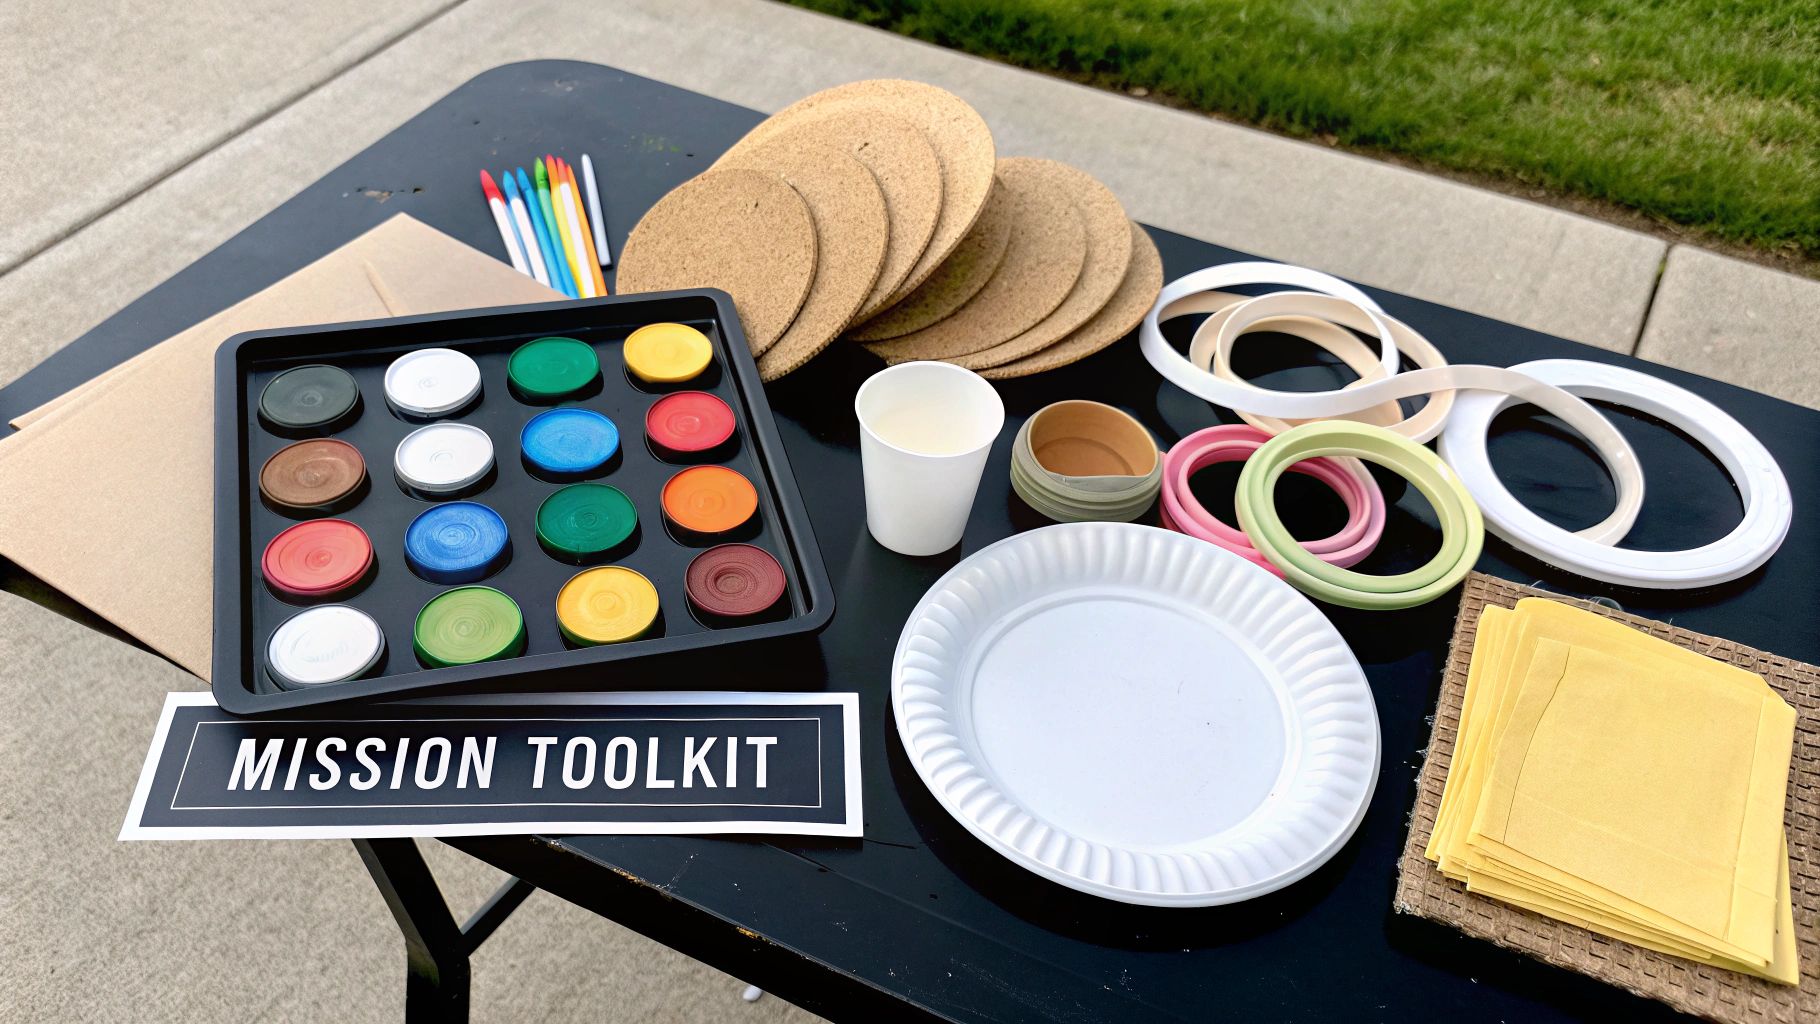
Think of yourself as the mission commander, choosing the best tools for the job. Getting this sorted first makes all the difference, whether you're crafting a simple poster or a full-on 3D model.
Choosing Your Project Supplies
So, what kind of solar system are you aiming to create? A flat poster that can hang proudly on the wall, or a three-dimensional model with planets you can actually hold? Your mission objective will decide your supply list. Here’s a quick flight check of what you might need.
-
For a Solar System Poster: The perfect deep-space background starts with a large sheet of black or dark blue paper. Grab some washable tempera paints, a few different-sized brushes, and maybe some glitter glue or star stickers for that extra galactic sparkle. Simple but effective!
-
For 3D Planet Models: Polystyrene balls in various sizes are your best bet here. You’ll definitely want acrylic paints for these, as they stick much better to the round surfaces. A few fine-tipped brushes will be a huge help for adding those iconic details, like Jupiter’s Great Red Spot.
-
For a Big Classroom Mural: This is a job for a whole crew! A massive roll of paper or a designated wall space is your canvas. Child-safe wall paints or big pots of poster paint are ideal, and using rollers and sponges helps cover a large area quickly. You could even use our free printable colouring pages for some brilliant inspiration or to cut out stencils.
Cosmic Craft Supply Checklist
To make things even easier, here's a quick checklist. Just find your project type below and see what you'll need at a glance.
| Project Type | Painting Surface | Essential Paints and Brushes | Extra Creative Bits |
|---|---|---|---|
| Poster | Large black/blue paper or card | Washable tempera paints, various brushes | Glitter, star stickers, chalk pens |
| 3D Model | Polystyrene balls (mixed sizes) | Acrylic paints, fine-tipped brushes | String/wire for hanging, glue |
| Mural | Large roll of paper or wall | Child-safe wall paint, poster paint | Sponges, rollers, stencils |
This table should help you stay organised and make sure you have everything ready before the fun begins.
Mission Prep Tip: Before you launch into painting, lay down some old newspaper or a plastic tablecloth to protect your surfaces. An old t-shirt or an apron is the official uniform for any serious Space Ranger artist—it keeps the cosmic mess off their clothes!
Once you've gathered everything, figuring out how to organize your craft supplies can be a game-changer. It keeps your workspace tidy and means less time searching for the right colour and more time creating a magnificent universe.
Alright, mission control, all systems are go. Let’s get to the fun part!
Bringing Your Planets to Life With Paint
Right then, Space Rangers, this is where the real magic happens! With our mission toolkit ready, it’s time to transform those blank shapes into a vibrant, swirling cosmos. This part is all about experimenting and having fun as we paint the solar system, one amazing planet at a time.
Whether you’re working on a flat poster or a 3D model, the goal is the same: to capture the unique personality of each planet. Don’t worry about perfection; this is about imagination and discovery. Let’s get our aprons on and start creating!
Crafting the Terrestrial Planets
Let's begin with the rocky worlds closest to the Sun. These planets are smaller but packed with character.
- Mercury: This little planet is a mix of greys and dark browns. Try dabbing on different shades of grey with a small sponge to give it a cratered, rocky texture.
- Venus: Often called Earth's "sister planet," Venus is covered in thick, yellowish-white clouds. Mix white and yellow paint, and then swirl them gently on your planet to create a cloudy, mysterious look.
- Earth: Our beautiful home! Start with a brilliant blue base for the oceans. Then, use a small brush or a cotton bud to dab on green for the continents. Don't forget to add swirls of white for the clouds!
- Mars: The famous "Red Planet." Mix red, orange, and a touch of brown to get that rusty, dusty colour. A fun technique is to paint it orange first, then use a dry brush to lightly add streaks of red over the top.
Talking about painting our home planet gets you thinking about how special it is. In the Space Ranger Fred stories, Fred’s spaceship runs on amazing technology. Here on Earth, we’re finding brilliant ways to power our world too. Ever wondered if your school could be a solar-powered spaceship base?
Kings School in Macclesfield installed 444 shiny solar panels, generating enough clean energy to power thousands of lightbulbs every year. This amazing step slashed their carbon emissions by the same amount as planting over 1,700 trees! You can learn more about how solar panels help schools become energy heroes.
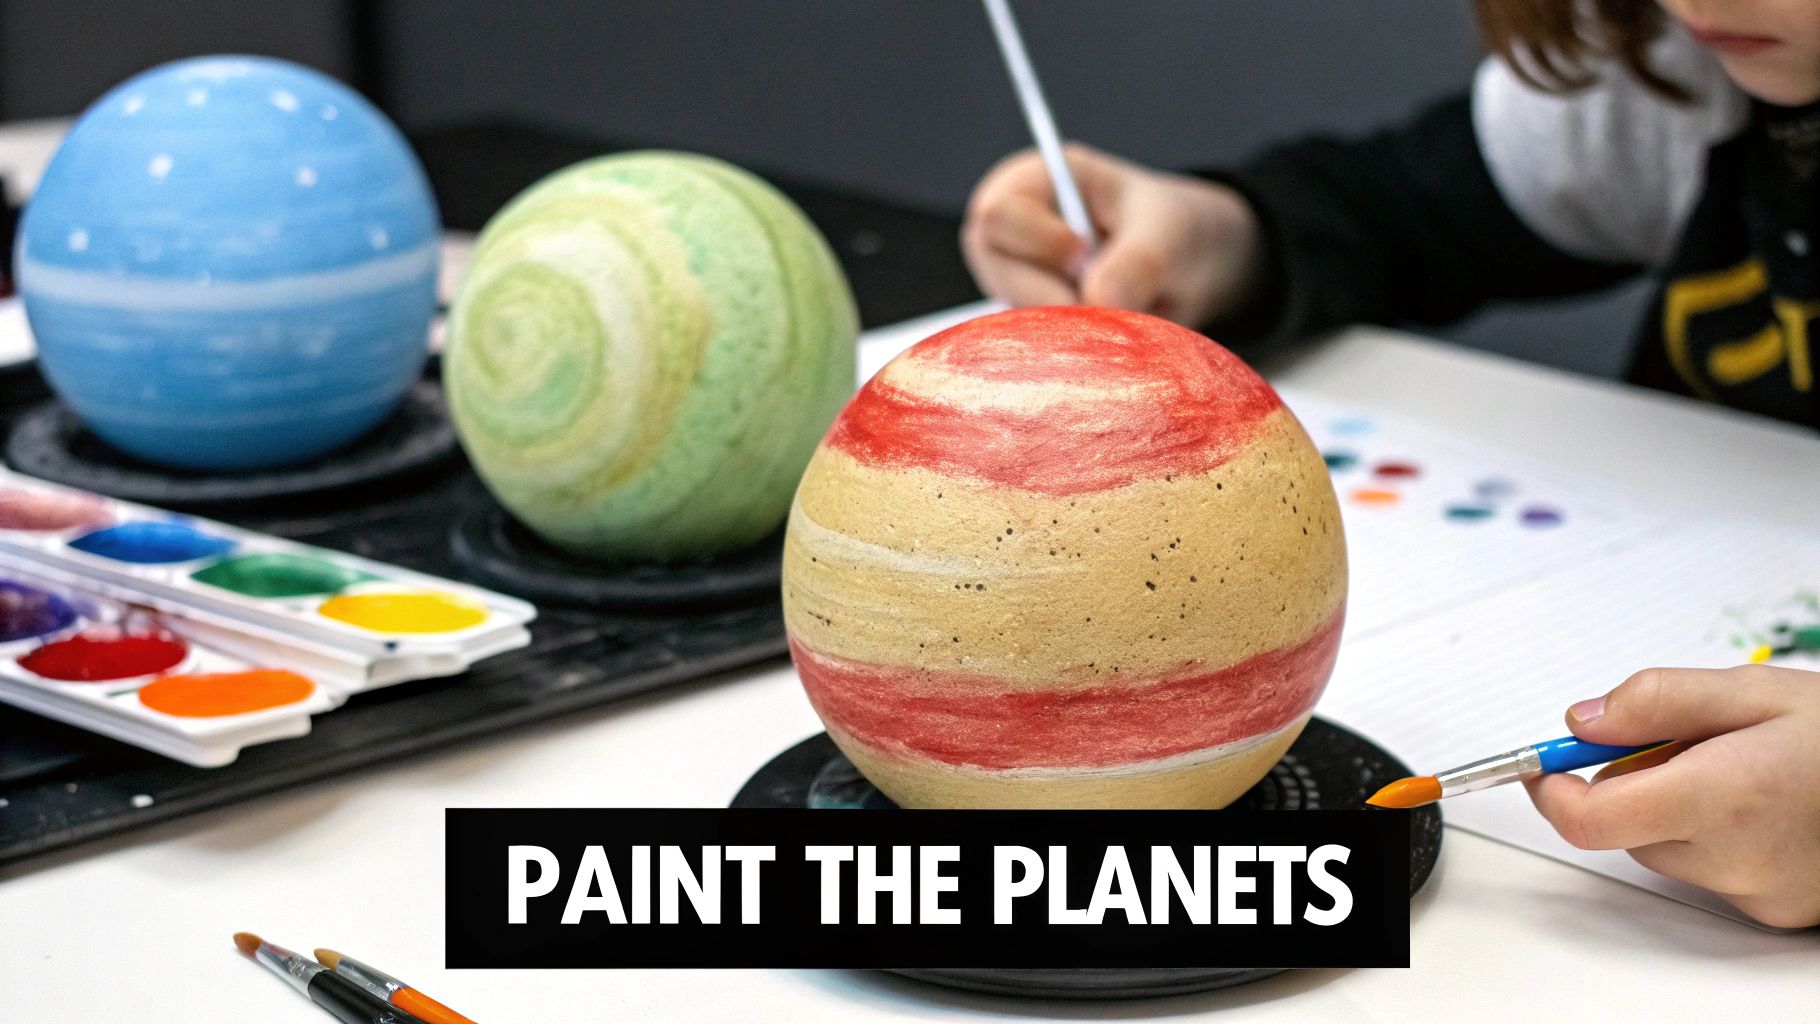
Painting the Giant Gas Worlds
Now for the giants of our solar system! These huge planets are all about bold colours, stripes, and swirls.
Jupiter is a fantastic planet to paint. It’s famous for its stormy atmosphere and the Great Red Spot. Start by painting your planet with stripes of light brown, orange, and white. While the paint is still a bit wet, use the end of your paintbrush to gently swirl the colours together. This creates a brilliant stormy effect. Then, add a big red oval for its famous storm.
For Saturn, start with a pale yellow or light beige colour. Its real beauty comes from its magnificent rings. You can create these by cutting a ring shape out of a piece of thin cardboard or a paper plate. Paint it with shades of grey and light brown, and once it's dry, you can slide it over your painted Saturn model. It’s an easy trick that looks truly spectacular.
Creative Mission Tip: When you paint solar system models, especially the gas giants, don't be afraid to layer colours. Let one colour dry a little before adding another on top. This builds depth and makes your planets look much more interesting and realistic.
Finally, we have the ice giants, Uranus and Neptune. Uranus has a lovely, pale blue-green colour, almost like a seafoam green. For Neptune, use a deep, rich blue. To give them an icy, windswept look, you can add some delicate white streaks with a very fine brush. It’s a simple touch that brings these distant, chilly worlds to life.
Painting the Universe Beyond the Planets
Your planets are looking fantastic, but now it's time to give them a home. A solar system isn't just a handful of planets hanging in empty space—it’s a swirling, sparkling, and utterly amazing place! Let's get to work filling in that deep, dark background with all the cosmic details that make our little corner of the universe so special.
This is a brilliant chance to talk about what else is out there. Thinking beyond the planets helps children really grasp the mind-boggling scale of space and discover all the other fascinating objects that share our galaxy.
Painting Our Star, the Sun
Every solar system needs a star at its centre, and ours has the magnificent Sun, the source of all light and energy for our planets.
Don't just stick to plain yellow. To get that fiery, solar-flare effect, grab your brightest oranges and even a touch of red. A great trick is to put blobs of yellow, orange, and white paint close together, then use a clean brush to gently swirl them into one another. It creates a wonderful, dynamic look that feels alive, just like the real thing.
Creating a Mysterious Asteroid Belt
Between Mars and Jupiter lies a huge ring of space rocks known as the asteroid belt. Adding this to your painting is a fantastic way to introduce the other objects whizzing around our solar system.
You don't need to paint thousands of individual rocks! An easy and really effective method is to use a sponge. Just dip a small piece of sponge into some grey or brown paint, dab most of it off on a spare bit of paper, and then gently press it in a wide arc between Mars and Jupiter. It creates a textured, rocky effect that looks just like a distant asteroid field.
Storytelling Spark: Imagine you're a space explorer like Fred, navigating through the asteroid belt. What would you see? Talking about these adventures is a fun way to bring your cosmic creation to life. Discover more cosmic wonders in the Space Ranger Fred books to fuel your imaginative stories!
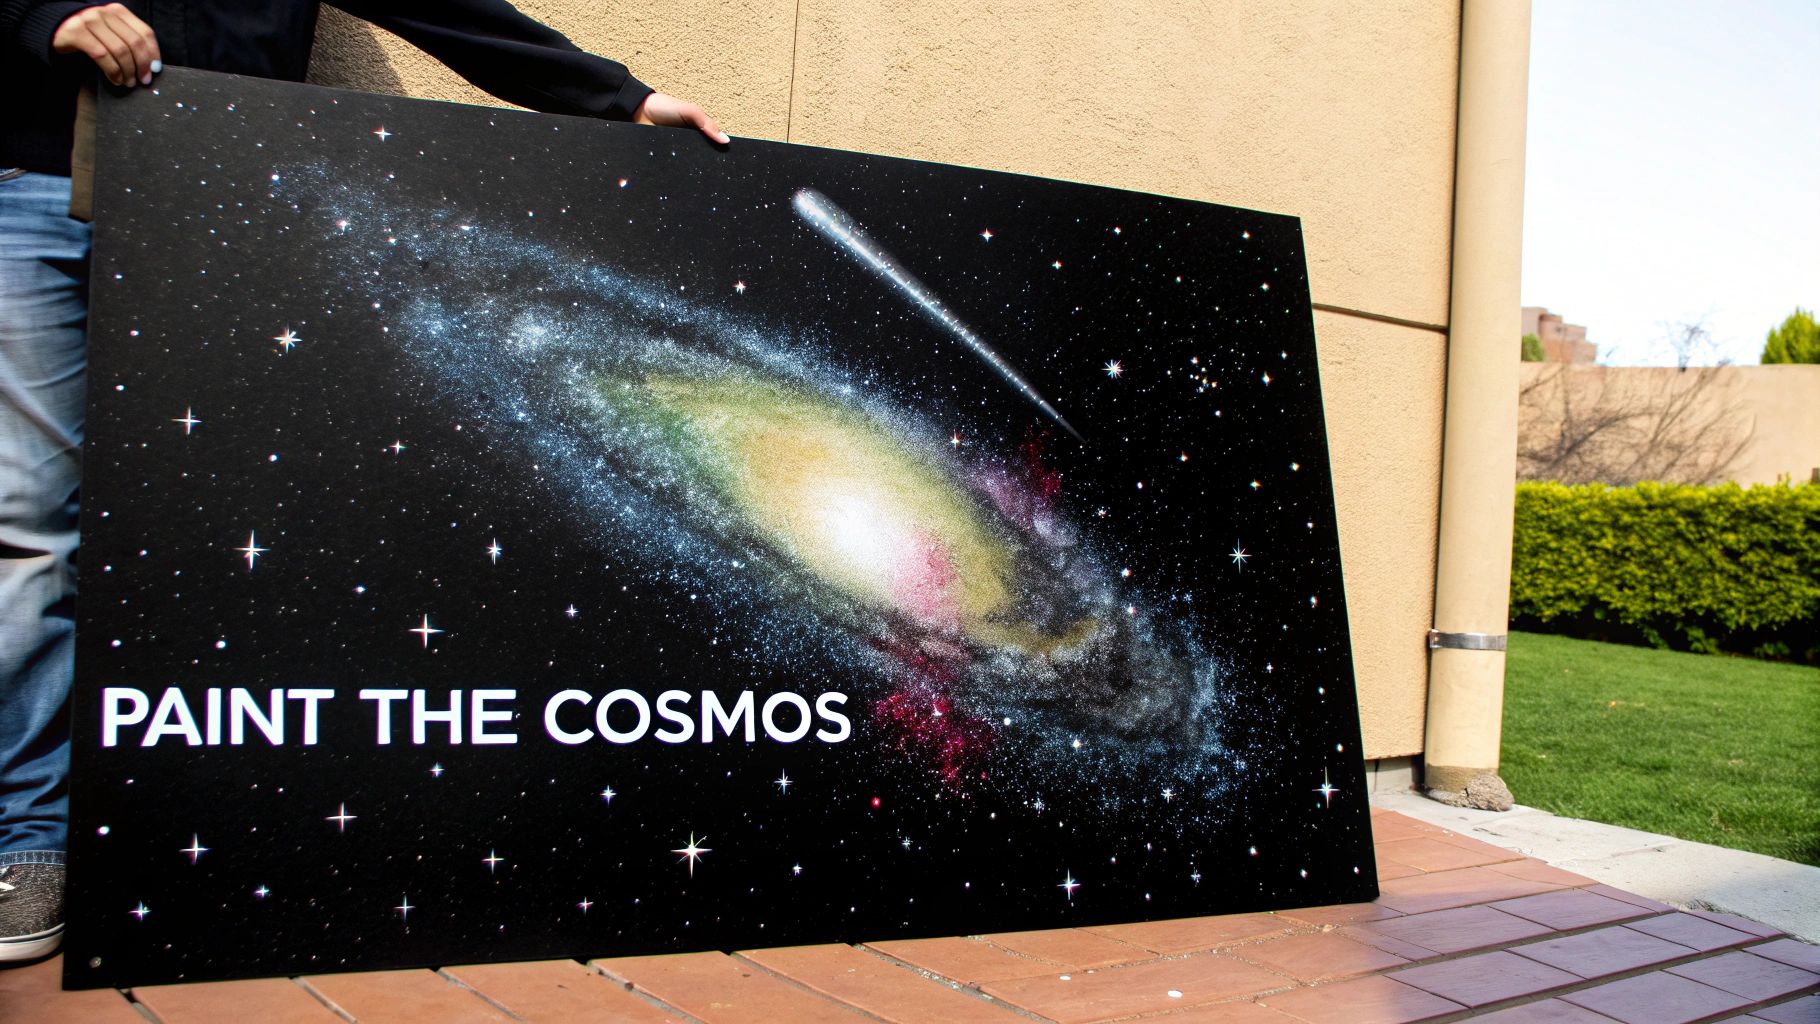
Adding a Dazzling Starry Background
Now for the final touch that makes any space painting truly magical—the stars. A star-filled background turns a simple painting into a breathtaking view of the galaxy.
The best technique for this is also the most fun: the toothbrush splatter!
- First, dip an old, clean toothbrush into some white paint. You don’t need a lot, just enough to coat the tips of the bristles.
- Next, hold the toothbrush over your dark background with the bristles pointing towards the paper.
- Then, using your thumb, gently pull back on the bristles and let them flick forward. This will spray a fine mist of tiny white dots across your painting, creating a perfect galaxy of stars.
For a little extra magic, you could add a shooting star or a comet. Just drag a blob of white or silver glitter glue across a corner of your painting to create a shimmering tail. It's a simple addition that adds a wonderful sense of movement and wonder to your finished masterpiece.
Connecting Your Cosmic Art to STEM Learning
So, you’ve created a stunning piece of cosmic art! But the mission isn't over yet, Space Ranger. Now comes the really cool part: connecting that brilliant project to real-world science, technology, engineering, and maths (STEM). This is where art and science blast off together, helping children grasp big ideas through hands-on play.
This is the heart of the Menturity™ approach—turning natural curiosity into confident learning. Your painted solar system is the perfect launchpad for some fantastic conversations and mini-experiments. It’s a chance to wonder out loud together and discover the answers by doing.
Turning Play into a Learning Mission
The best learning happens when it doesn't even feel like a lesson. With your cosmic creation sitting right there, you can start exploring some amazing ideas.
- Model the Orbits: If you’ve made 3D planets, grab a lamp to be the Sun. Can you arrange the planets in the correct order around it? Get them moving and talk about how they travel on paths called orbits.
- Ask Curious Questions: Use the planets you’ve painted as conversation starters. "I wonder why Mars is so red?" or "Why do you think Jupiter is so big and stripey?" There are no wrong answers here, only brilliant ideas.
- Explore Scale and Distance: It's true your model isn't to scale (that would be very tricky!), but you can still talk about which planets are huge gas giants and which are smaller rocky worlds. It helps little minds begin to visualise the sheer vastness of space.
Learning about planets and energy can even connect right back to our world. You can blast off with some facts that make school feel like a Space Ranger Fred mission! For instance, an organisation called Energy Sparks is currently working with 1,210 schools across the UK, helping them track their electricity, gas, and solar generation to fight climate change.
The Carbon Trust found this kind of work could save UK schools £44 million a year and offset 625,000 tonnes of CO2. That’s like powering 80,000 homes cleanly! You can even discover more about how schools are using renewable energy right now.
The Power of STEAM
When you add the 'A' for Arts into STEM, you get STEAM. This approach shows that creativity is a huge part of science and engineering. Think about it: an artist mixing colours is a lot like a chemist mixing elements—both are experimenting to create something brand new. This project is a perfect example of STEAM in action.
By painting the solar system, your child isn't just making a pretty picture. They're building a mental map of our cosmic neighbourhood, problem-solving how to create Saturn's rings, and communicating their ideas through colour and shape.
This blend of creativity and science is at the core of so many incredible discoveries. To see how these ideas fit together in more detail, you might be interested in our guide on what STEAM education is all about. It's all about encouraging children to think like inventors, artists, and explorers—all at the same time.
Mission Control: Your Questions Answered
Even the best space missions run into a few questions. Think of this as your direct line to mission control, where we've got quick answers to the common queries that pop up during any cosmic creative adventure.
Getting these sorted before you start means your project is much more likely to be a stellar success. So, whether you're wondering about the best paint for the job or how to wrangle a mission with very young astronauts, we've got you covered. Let's tackle those cosmic conundrums.
What Is the Best Paint for a Kids Solar System Project?
This really depends on your mission! For posters and other paper-based creations, washable tempera or poster paint is your best friend. It’s a dream to work with—non-toxic, cleans up easily with just soap and water, and the colours are wonderfully bright and cheerful.
Now, if you’re taking on a 3D project with polystyrene balls, you'll want to switch to acrylic paint. It gives fantastic coverage on those tricky, porous surfaces and dries with a durable finish that lasts. Just remember to pop on an apron and make sure you’re painting in a well-ventilated space!
How Can We Make the Planets Look More Realistic?
The secret here is all about adding layers and having fun with texture! Before you even pick up a brush, pull up some real photos of the planets and have a look together. Notice all the amazing swirls, spots, and subtle shades.
- Jupiter: Use a small piece of sponge to dab different colours onto the surface. This creates a wonderfully stormy, atmospheric effect that mimics its Great Red Spot and cloud bands.
- Saturn: To get those famous rings, simply cut a doughnut shape from a thin piece of cardboard and slide it over your finished planet. Easy and effective!
- Mars: Start with an orange base coat. Once it's dry, use a stiff, dry brush to lightly add streaks of red over the top for that classic dusty, rust-coloured feel.
Honestly, the most important thing is to let your young artist's creativity shine. Every solar system will be beautifully unique, and that's exactly what makes these projects so special.
How Much Time Should We Set Aside for This Activity?
Your mission duration really depends on the scale of your project. A colourful solar system poster can be a fantastic 45-minute activity, perfect for filling a rainy afternoon with a bit of cosmic fun.
On the other hand, creating a full set of detailed 3D planet models might be better split over a weekend. This gives each planet plenty of time to dry properly before you add more details or hang them up.
And for a huge classroom mural? Think of it as a brilliant week-long project where the whole crew can contribute a little bit each day. My best advice is to simply enjoy the journey and not rush the creative process.
How Can I Adapt This Project for Younger Children?
Absolutely! For your younger Space Rangers, the key is to simplify. Focus on the big, bold shapes and the pure joy of splashing colour around.
A great tip is to pre-cut the planet circles from card so they can dive straight into the fun part—the painting! Encourage them to use their favourite colours and just talk about one simple, fun fact for each planet, like, "This is Earth, where all our friends live!"
Using star stickers and a bit of glitter is also a wonderful way for little hands to decorate the deep-space background without getting too messy.
At Space Ranger Fred, we believe that every craft project is a launchpad for curiosity and adventure. We hope this guide helps you and your young explorer create a cosmic masterpiece you can be proud of. To continue your journey through the stars, why not explore our world of books and activities?