One rainy afternoon, a child in my class spotted a bright patch of light sneaking through a tiny gap in the curtains and gasped, “It's making a picture on the wall!” That little moment is the doorway to one of the oldest and coolest bits of science around.
Your Top Secret Mission to Capture Light
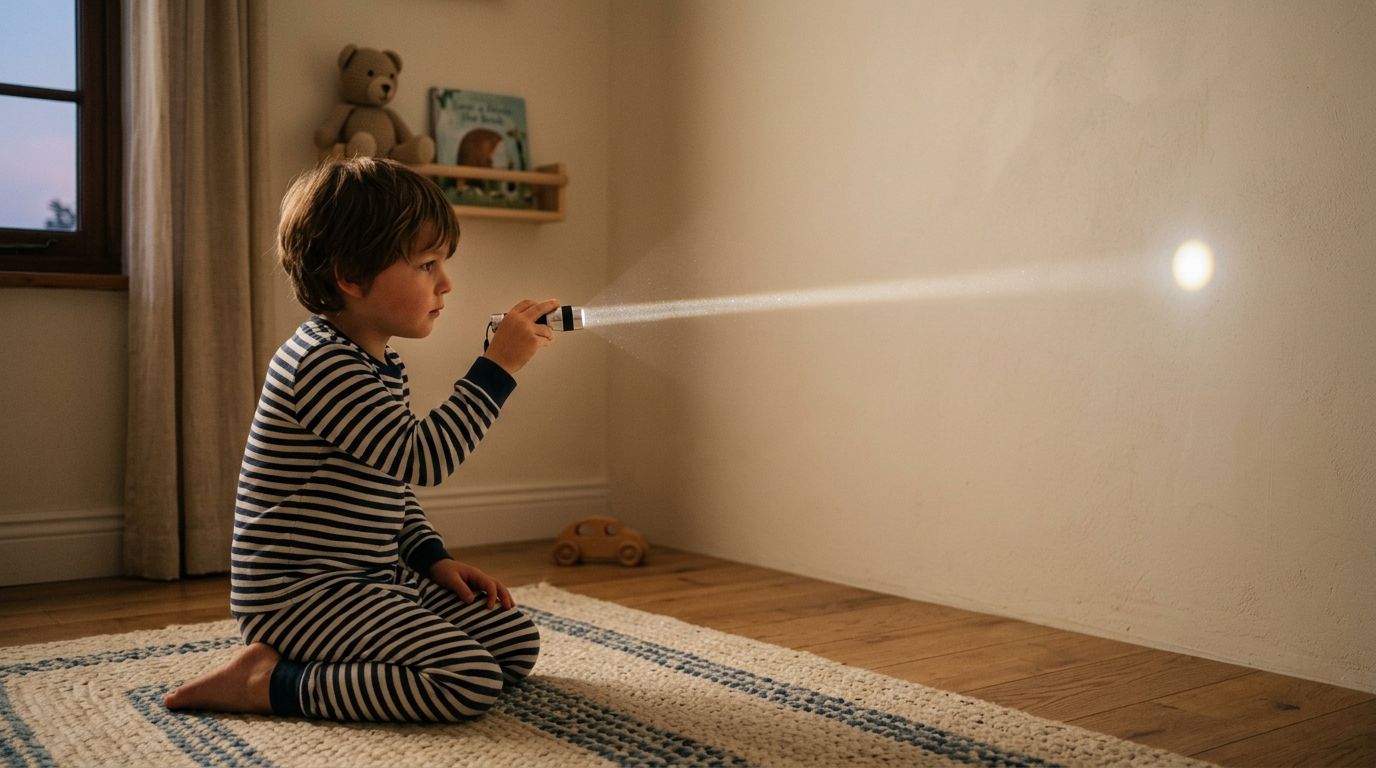
You're in a dim room. The curtains are nearly shut. Then a tiny sliver of daylight peeks through, and suddenly there's a strange shape on the opposite wall. Not just light. A picture.
That's the sort of clue that would send any young explorer scrambling for their notebook.
A pinhole camera looks almost too simple to be real. No fancy lens. No battery. No buttons making dramatic beeping noises. Just a dark box and a tiny hole. Yet it can still make an image.
So, how does a pinhole camera work?
It works by letting only a narrow bundle of light into a dark space. That tiny opening controls where the light can go, so a picture forms on the inside surface. It feels like magic at first. It isn't magic. It's light being wonderfully well-behaved.
A mission question
Try asking a child this.
- Could a shoebox become a camera
- Could a tiny hole make a picture
- Could the picture come out upside down
The answer to all three is yes.
Mission clue: A pinhole camera is one of the simplest ways to see that light doesn't wobble about randomly. It travels in a very organised way.
That's why pinhole cameras are such brilliant classroom tools. Children don't just hear about light. They see it doing its job. They think. They try. They can explain.
The Superpower of Light Straight Lines
If you shine a torch across a dark room, the beam doesn't curl round the wardrobe and pop out behind the cat. It goes straight. That's the secret.
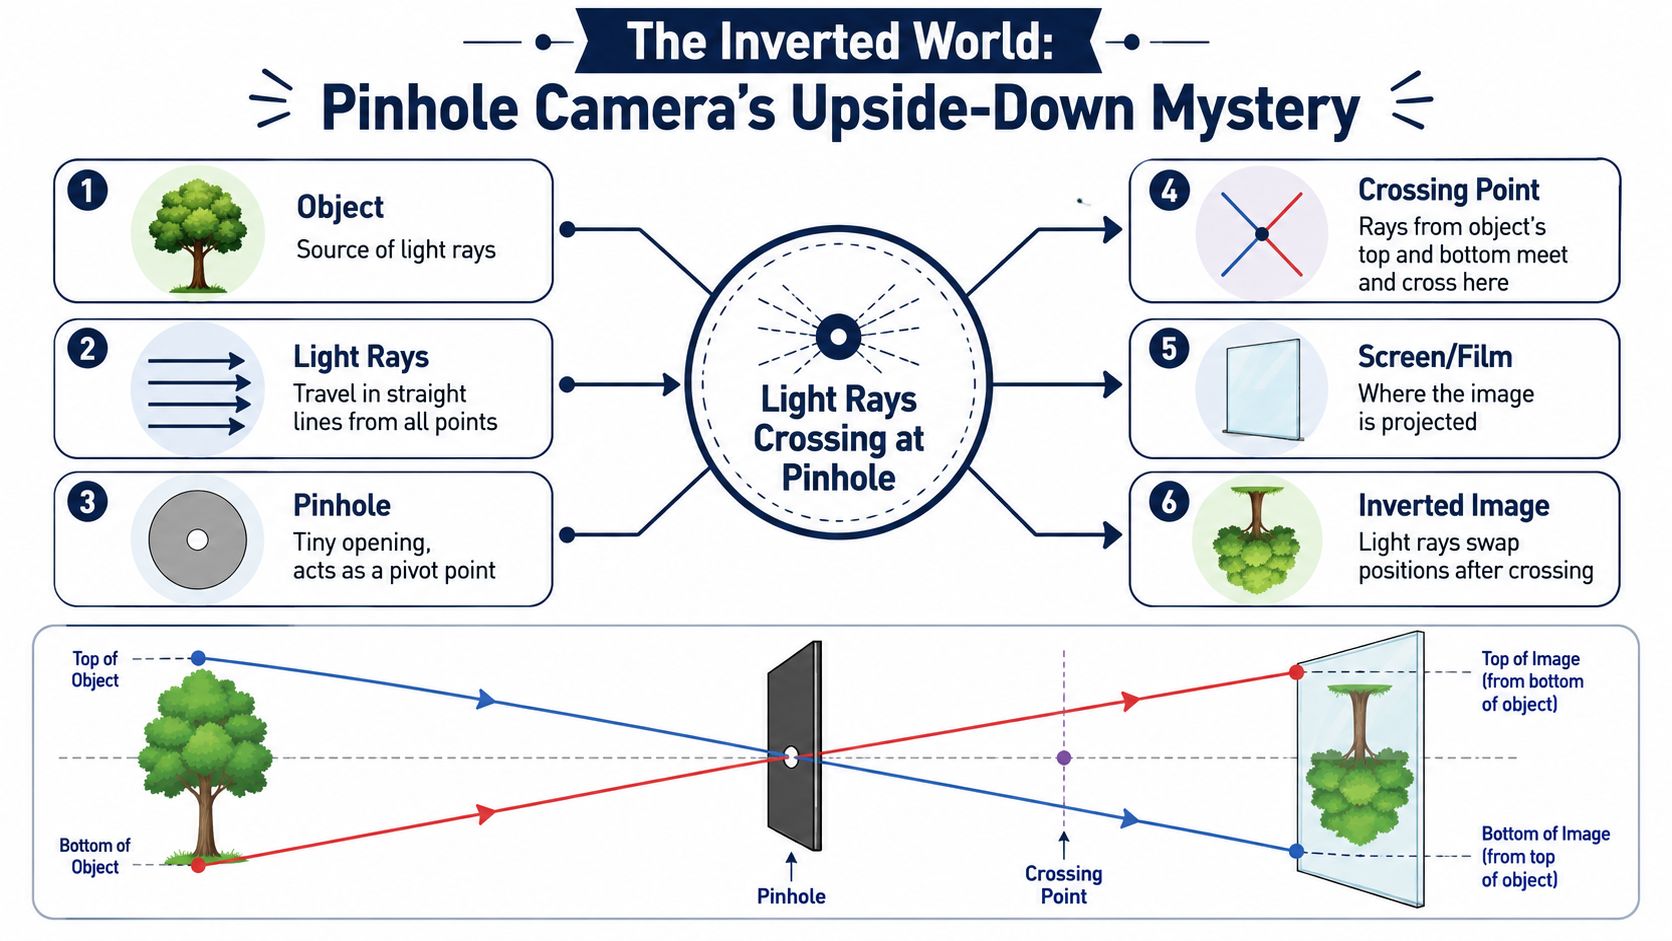
A pinhole camera works because light travels in straight lines. This is called the camera obscura effect. Light from the top of an object goes through the pinhole and lands at the bottom of the screen inside the camera, while light from the bottom of the object lands at the top, as explained in this camera obscura demonstration.
Why the tiny hole matters
If the opening were huge, light from lots of directions would pour in and blur together. The tiny hole acts like a strict spaceport gate. Only a small amount of light gets through, and that helps keep the picture recognisable.
Consider it this way.
- Big opening means more light, but more muddle
- Tiny opening means less light, but better control
- Dark box means the image can be seen
Children often ask why the box has to be dark. Because if stray light is bouncing around inside, the projected picture gets washed out. The darkness gives the image somewhere to appear clearly.
A science word worth knowing
Camera obscura is a brilliant old term. It means dark room. Long before modern cameras existed, people noticed that a dark space with a tiny hole could project an outside scene.
If your class loves space, this links beautifully with star watching too. Light from stars also travels in straight lines across vast distances, which is one reason activities like this pair nicely with lessons such as what makes the sky blue.
Light behaves so reliably that a simple box can turn into a picture-making machine.
Why is the Picture Topsy-Turvy
This is the part that makes children grin.
You point your pinhole camera at a tree, and the tree appears upside down. It can seem very odd until you picture the light rays crossing over.
The doorway swap idea
Imagine two children trying to pass through a very tiny doorway at the same time.
One starts high up on one side.
The other starts low down on the other side.
As they squeeze through the middle, they swap sides.
That's what light does at the pinhole.
- Light from the top of the object travels through the hole and lands at the bottom of the screen
- Light from the bottom travels through and lands at the top
- The same swapping happens left to right as well
That crossover creates the inverted image.
Why children mix this up with mirrors
A mirror flips front to back in the way we usually describe it. A pinhole camera is different. It forms an image because rays from different parts of the object cross at one tiny point.
So if a child says, “It's upside down because it's reflecting,” that's a great moment to gently steer them back. It's not bouncing off a mirror. It's being projected.
Quick check for understanding: If the top of a candle sends light through the hole, where does it land inside the box? At the bottom.
Once children say that confidently, they've got the core idea.
Build Your Own Light Catcher 2026 Model
Space Ranger Fred has reached the workshop bay. Now the mission gets hands-on.
You do not need fancy camera kit to catch light. A simple box can become a mini science machine when it is dark inside and has one tiny opening for light to slip through.
Your build kit
Gather your mission supplies:
- Shoebox for the camera body
- Aluminium foil for the pinhole area
- Tracing paper for the screen
- Tape to block sneaky light leaks
- Scissors for cutting windows
- Pin for making the tiny hole
Adult help is a good call for any cutting.
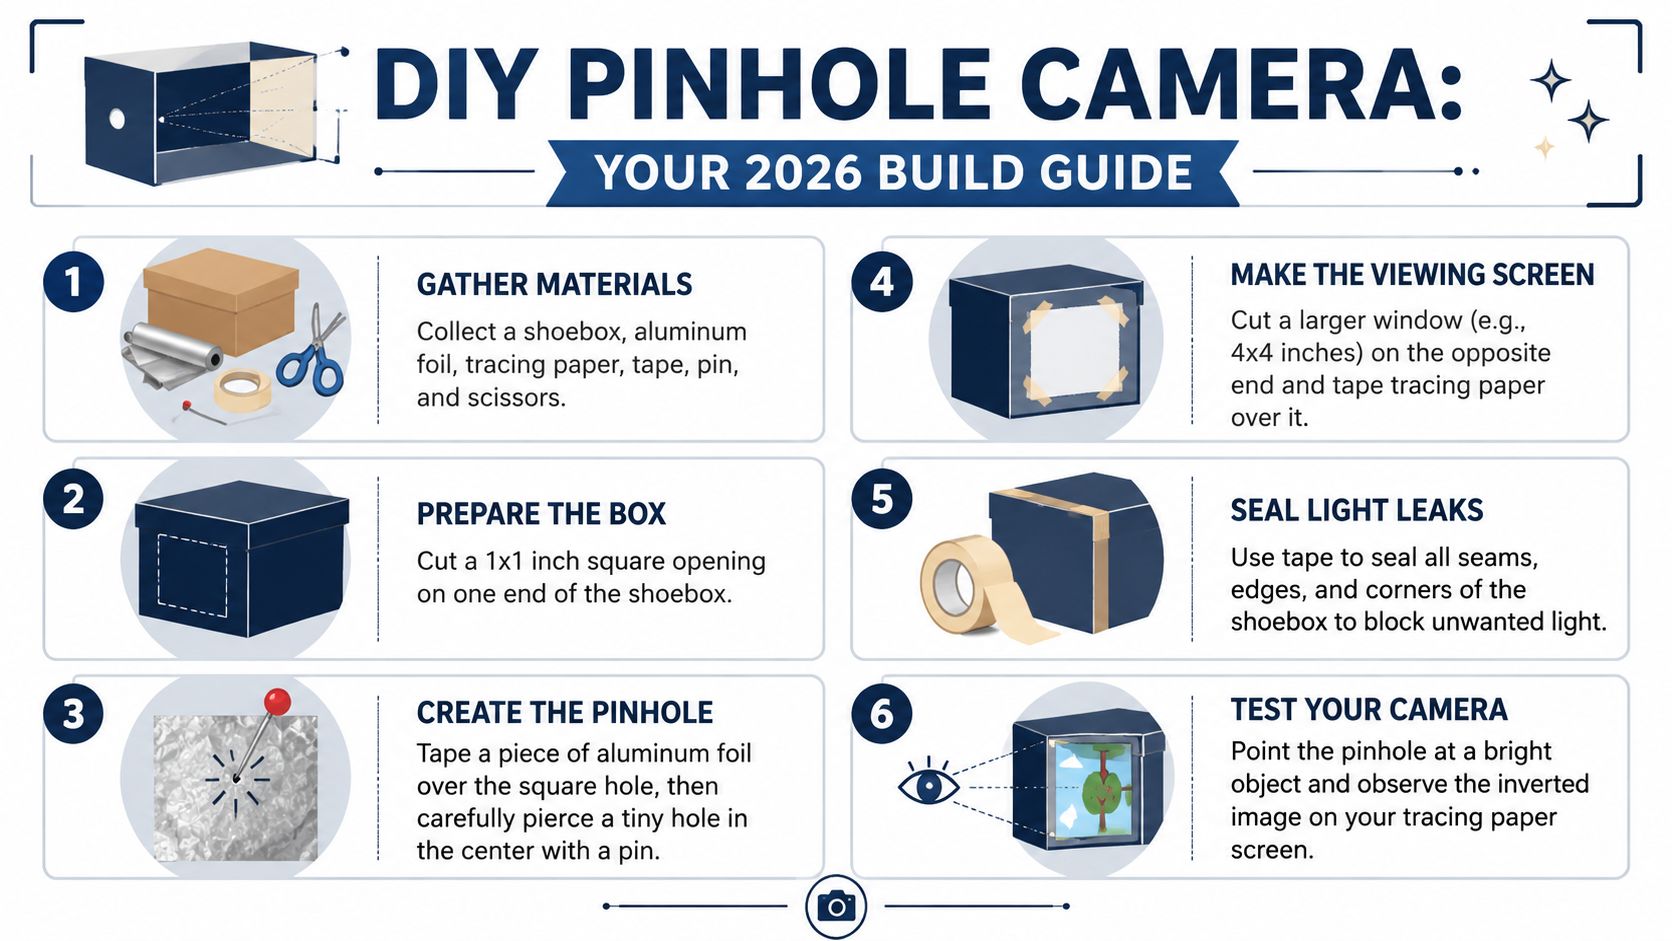
Six build steps for your light catcher
- Cut a small square opening in one end of the shoebox.
- Tape a piece of aluminium foil over that opening.
- Carefully poke a tiny hole in the foil with a pin.
- Cut a larger viewing window at the other end of the box.
- Tape tracing paper over that larger window.
- Seal the edges and corners of the box with tape so extra light stays out.
NASA's classroom guide gives a helpful starting point. For a shoebox camera, a pinhole around 2 mm wide can give a picture that is clear enough to spot without making the wait too frustrating, as noted in NASA's how to make a pinhole camera activity.
Test your invention
Take your Light Catcher to a bright spot. Point the foil end at a sunny outdoor scene or a well-lit lamp indoors, then look at the tracing paper screen from the back.
If the picture looks faint, check two things first. The camera may need brighter light outside, or the box may have tiny gaps letting stray light flood in. Children often expect an instant bright picture like a phone screen, so this is a useful moment to remind them that a pinhole camera is a patient little explorer.
Decoration makes the project even more fun. Children who enjoy crafts could customise their camera and try a colourful follow-up activity with this stained glass window template.
Here's a handy video to support the build:
Build rule: If the picture looks washed out, the box usually needs a darker interior or tighter sealing around the edges.
Fred would call this a proper field test. Build it, adjust it, peek again, and keep going until your homemade spacecraft camera catches its first upside-down view of the world.
Become a Master Pinhole Photographer
Space Ranger Fred has built the Light Catcher. Now it is time to train like a real mission scientist.
A pinhole camera is brilliant for experiments because one tiny change can give a very different result. Children get to spot the pattern for themselves, which is far more exciting than being told the answer.
Bigger and smaller changes
Start with the pinhole. A smaller hole usually gives a sharper picture, but the image becomes dimmer because less light can squeeze through. A larger hole lets in more light, so the picture looks brighter, but the edges often turn blurry.
It works a bit like peeking through a narrow crack in a door. You see a tidier slice of the scene, but not much light gets through. Open the gap wider and the room looks brighter, yet the view loses some neatness.
Try turning it into Fred's prediction challenge:
- Make the hole slightly bigger and ask what might happen to brightness and sharpness
- Make it smaller and ask children to predict again
- Test and compare what they see
That is proper evidence-gathering. Fred would call it mission science.
Change the box length
The next clever test is changing the distance between the pinhole and the screen. A longer box can make the image appear larger, while a shorter box gives a smaller view. Children often enjoy this moment because it feels a bit like adjusting a spacecraft viewer.
Wikipedia's pinhole camera overview explains this idea clearly, and it gives children a first taste of how camera design changes the final image.
A simple classroom version could look like this:
| Change | What children may notice |
|---|---|
| Shorter box | Smaller image, wider view |
| Longer box | Bigger image, more zoomed-in view |
If children start asking how scientists make faraway things look bigger and clearer, a natural next mission is learning how telescopes work.
You can also hand out an observation sheet with three simple prompts:
- What changed
- What stayed the same
- What do you think caused it
For more printable ideas and hands-on fun, families and schools can dip into the free activities page.
Mission Accomplished and Your Next Adventure
By now, you can answer the big question with confidence.
How does a pinhole camera work? It works because light travels in straight lines through a tiny hole into a dark space, where it forms an image. The picture appears upside down because the rays from the top and bottom of the object cross at the pinhole.
That's a mighty bit of science from such a small device.
Children don't need complicated kit to understand real physics. They need a chance to notice, test, and talk about what they see. A pinhole camera does all three. It turns a shoebox into evidence.
One last science nugget
The tiny opening in a pinhole camera is doing careful mathematical work. For example, a camera with a 0.5 mm pinhole and a 50 mm distance to the screen has an f-number of f/100. This means it needs a lot more light and time to take a picture than a normal camera, sometimes requiring exposures from 5 seconds to many hours, according to this BYJU'S pinhole camera guide.
That's why patience matters. So does curiosity.
You've not just made a craft. You've built a working model that helps children explain how light behaves.
And that's the best kind of mission. One where science feels exciting, understandable, and just a little bit magical.
If your young explorer is ready for more story-led science, take a look at Space Ranger Fred. You'll find fun books, hands-on learning, and space-filled adventures that help children build confidence in reading, thinking, and explaining big ideas. Teachers, parents, and librarians can also explore the book collection and bring the fun to life with interactive school visits, where storytelling and STEM work together to boost confidence, communication, and a love of learning. Learning should be experienced, not just delivered.