Ever wondered why a volcano erupts or how a rainbow can magically appear in a glass of milk? Hey, science isn’t just for fancy labs and dusty textbooks; it’s a thrilling adventure waiting to happen right in your kitchen! Getting your hands dirty with real-world wonders is an awesome way to learn, sparking a curiosity that can last a lifetime. This guide is your launchpad into a universe of discovery, packed with ten amazing science experiments for kids that turn everyday stuff into mind-blowing scientific moments.
We’ve set up each activity to be simple, safe, and seriously fun. You won’t just find step-by-step instructions here. We’ll also chat about the cool science behind the magic, answering the big ‘why’ behind each fizz, pop, and color change. These experiments are designed to build your STEM skills, get you thinking like a scientist, and prove that learning can be an unforgettable quest. So, let’s grab our materials, put on our thinking caps, and get ready to make a bit of a creative mess. Let’s dive in and start exploring the incredible world of science together!
1. Volcano Eruption (Baking Soda and Vinegar)
The classic baking soda and vinegar volcano is one of the most iconic science experiments for kids, giving you a front-row seat to a chemical reaction. This experiment beautifully demonstrates what happens when an acid and a base get together. When vinegar (an acid) mixes with baking soda (a base), they react to produce carbon dioxide gas. This gas bubbles up and erupts, just like a real volcano!
This hands-on activity is a star at science fairs and summer camps because it’s simple, safe, and has a huge “wow” factor. It’s a super tangible way to see a chemical reaction in action, making abstract concepts like gas production feel real and exciting.
How to Create Your Eruption
First up, you’ll want to build your volcano structure around a small plastic bottle or container. You can use clay, play-doh, or even paper-mâché for a fun arts and crafts project.
- Add the Base: Place a few tablespoons of baking soda into the bottle. A funnel makes this step much tidier.
- Prepare the “Lava”: In a separate jug, mix about 250ml of vinegar with a few drops of red or orange food coloring and a squirt of dish soap. The soap helps create more bubbles for a foamier eruption.
- Start the Reaction: When you’re ready, pour the vinegar mixture into the bottle and stand back to watch the lava flow!
Pro-Tip: Always do this experiment on a tray or outdoors to contain the mess. For older kids, you can introduce the chemical equation (NaHCO₃ + CH₃COOH → CH₃COONa + H₂O + CO₂) to explain exactly what’s happening at a molecular level.
2. Rainbow Milk Experiment
The Rainbow Milk experiment is a mesmerizing and artistic way to see key scientific principles like surface tension in action. This simple yet visually stunning activity shows how a single drop of dish soap can create an explosion of color in milk. It’s a fantastic way to introduce the invisible world of molecules and how they interact with each other.
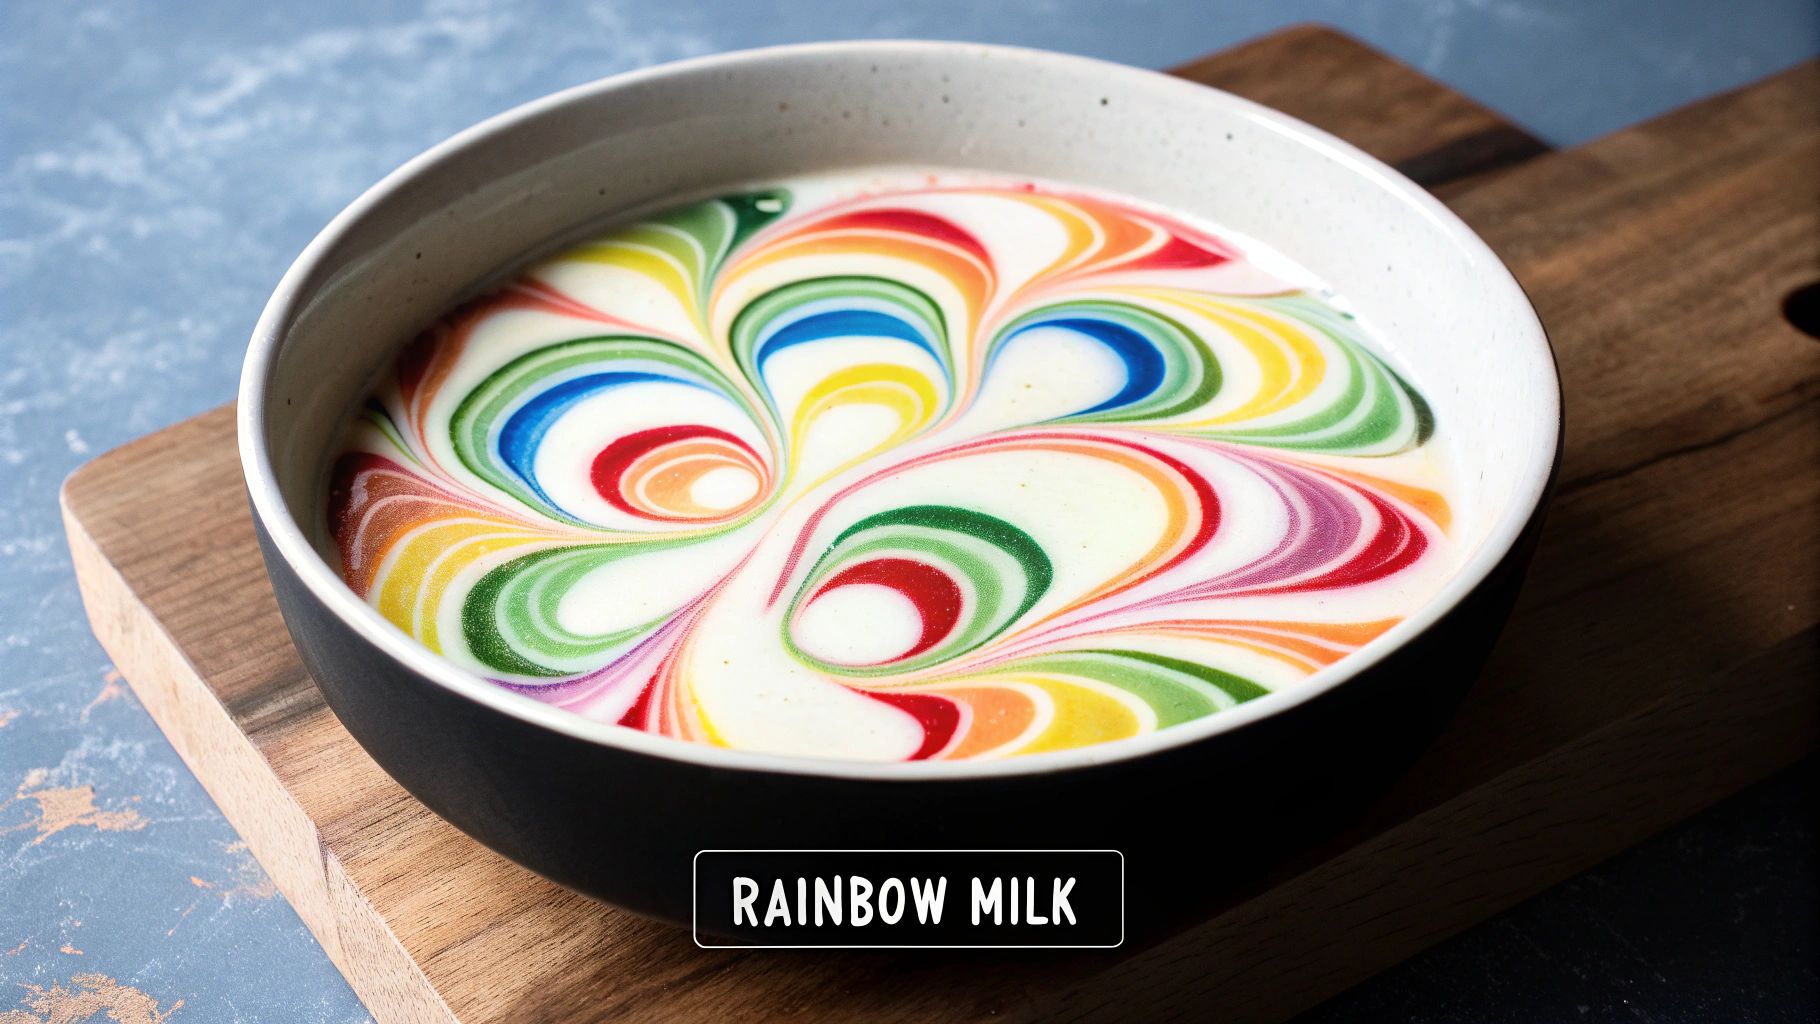
This experiment is a hit in classrooms and online science tutorials because it requires minimal setup for a high-impact result. Watching the colors burst and swirl provides a tangible lesson on how soap molecules break down fats, making abstract chemistry concepts both beautiful and understandable. It’s one of those science experiments for kids that feels more like magic than a lesson.
How to Create Your Color Explosion
First, you’ll need a shallow dish or plate. A white one works best to make the colors really pop. The magic here is all about the reaction between the fat in the milk and the soap.
- Set the Scene: Pour a thin layer of milk into the dish, just enough to cover the bottom. Whole or semi-skimmed milk is ideal because of its higher fat content.
- Add the Colors: Gently drop a few different colors of food coloring onto the surface of the milk. Try to place them in different spots without mixing them up.
- Start the Reaction: Dip the end of a cotton swab into a small amount of dish soap. Touch the soapy tip to the center of one of the color puddles and watch the colors race away!
Pro-Tip: For older kids, you can explain that soap molecules have two ends: one that loves water (hydrophilic) and another that loves fat (hydrophobic). The hydrophobic end chases the fat molecules in the milk, causing that awesome, swirling motion.
3. Invisible Ink with Lemon Juice
Ready to be a super spy? This classic chemistry experiment uses something you probably have in your fridge: lemon juice! This fascinating activity explores the science of oxidation. The acid in lemon juice weakens the paper’s fibers. When you heat it, the parts of the paper with the acid on them oxidize (or “burn”) faster than the rest, revealing your secret message in brown.
This experiment is a brilliant way to introduce kids to organic chemistry. It even has historical roots—it was used for secret letters during the Revolutionary War and by spies in World War I! It’s one of those science experiments for kids that perfectly blends history, mystery, and a hands-on chemical reaction.
How to Reveal Your Secret Message
Writing your secret note is simple, but revealing it needs a little patience and care. You can use a cotton swab, a small paintbrush, or even a toothpick to write.
- Write the Message: Squeeze some lemon juice into a small bowl. Dip your chosen writing tool into the juice and write your secret message on a piece of white paper.
- Let It Dry: Allow the lemon juice to dry completely. Your message will become invisible once all the moisture has evaporated.
- Apply Heat: With adult supervision, gently heat the paper to reveal the message. You can hold it close to a warm (but not hot) light bulb, use a hairdryer, or have a grown-up carefully press it with a warm iron.
Pro-Tip: Make sure the heat source isn’t too hot, as the paper could scorch or even catch fire. For older kids, you can talk about how the heat causes the carbon compounds in the lemon juice to break down and turn brown, a process related to caramelization.
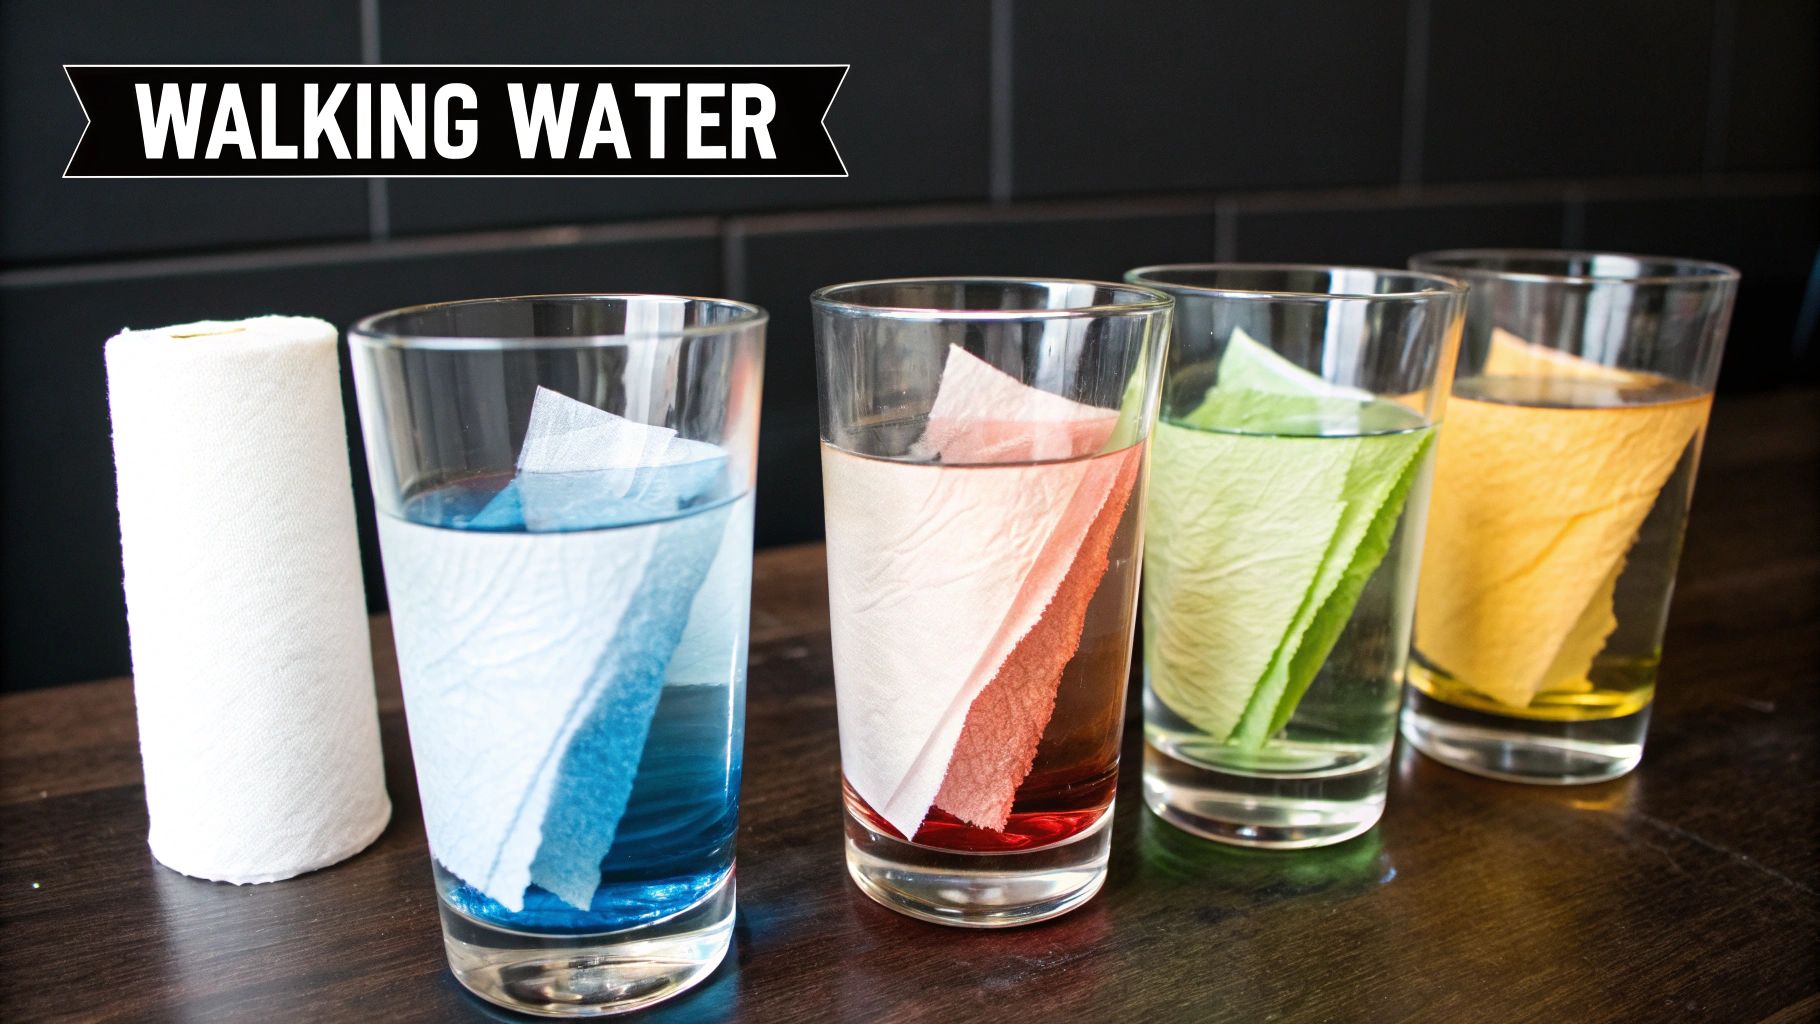
4. Walking Water Experiment
The Walking Water experiment is a super colorful way to demonstrate the scientific principle of capillary action. This cool activity shows how water can move against gravity, seemingly “walking” along paper towel bridges from one glass to another. It brilliantly combines lessons in fluid dynamics with basic color theory, making it one of the most engaging science experiments for kids.
This experiment is a staple in classrooms and homeschool lessons because it uses simple household materials and produces a beautiful result. You can watch how primary colors mix to create secondary colors, getting a hands-on art lesson right alongside the science.
How to Make Water Walk
For this experiment, you’ll need several clear glasses, water, food coloring (red, yellow, and blue), and absorbent paper towels. Arrange the glasses in a circle or a line.
- Set Up Your Glasses: Fill every other glass about three-quarters full with water, leaving the glasses in between empty.
- Add the Color: Add red, yellow, and blue food coloring to the water-filled glasses, one color per glass.
- Create the Bridges: Fold a sheet of paper towel into a long, narrow strip. Place one end into a glass with colored water and the other end into an adjacent empty glass. Do this for all the glasses.
- Observe the Magic: Watch as the colored water is absorbed by the paper towels and travels into the empty glasses, mixing to create new colors. It takes a little while, so be patient!
Pro-Tip: Use a really absorbent paper towel for the best results. You can explain to your child that this is the same process, capillary action, that plants and trees use to draw water up from the soil through their roots and stems. How cool is that?
5. Static Electricity Balloon Experiments
Exploring the invisible forces of static electricity is one of the most magical science experiments for kids, and all you need is a balloon! This experiment introduces the concepts of electrical charges. When you rub a balloon on a sweater or your hair, it picks up extra electrons, giving it a negative charge. This charge can then attract or repel other objects.
This hands-on activity is perfect for a rainy day and needs almost no setup, yet it brilliantly demonstrates fundamental physics principles. It makes abstract ideas like positive and negative charges feel real, letting you see how these forces interact with the world in surprising ways.
How to Conduct Your Experiments
First, inflate a balloon and tie it off. The magic works best when the air is dry, as humidity can mess with the static charge.
- Build the Charge: Rub the balloon vigorously on your hair or a woolly sweater for about 10-15 seconds. This transfers electrons to the balloon, charging it up.
- Attract Objects: Bring the charged balloon close to small, light objects like tiny pieces of paper, salt, or pepper. Watch them jump up and stick to the balloon!
- Bend Water: Turn on a tap so you have a very thin, steady stream of water. Slowly bring the charged balloon near the stream (without touching it) and watch the water bend towards it. It’s like having superpowers!
Pro-Tip: Explain that the balloon becomes negatively charged, while your hair becomes positively charged. You can demonstrate repulsion by charging two balloons and trying to push them together; they’ll resist, showing how like charges push each other away.
6. Crystal Growing Experiment
Growing your own crystals is a captivating long-term project that introduces you to the wonders of chemistry and geology. It shows how dissolved solids in a special “supersaturated” solution can arrange themselves into beautiful, geometric structures over time. By using common stuff like sugar, salt, or alum, you can patiently watch the process of crystallization happen right before your eyes.
This slow-paced activity is fantastic for teaching patience and observation skills. It gives you a real connection to how natural gems and crystals form deep within the Earth, making geology concepts like mineralogy much easier to understand and way more exciting.
How to Grow Your Own Crystals
First, you’ll need to create a supersaturated solution. That’s just a fancy way of saying a solution that has more dissolved stuff in it than it can normally hold.
- Create the Solution: With adult supervision, heat distilled water (using distilled water helps make clearer crystals) and stir in your chosen solid (like salt or sugar) until no more will dissolve.
- Prepare Your Seed: Pour the solution into a clean glass jar. Tie a piece of string to a pencil or wooden stick and lay it across the top of the jar, letting the string hang down into the solution. This string acts as a “seed” for the crystals to grow on.
- Wait and Observe: Place the jar somewhere it won’t be disturbed. Crystals should start to form on the string within a few days.
Pro-Tip: Take daily photos to create a time-lapse of your crystals growing! You can talk about how this is similar to how crystals form in nature, like in caves and mines, but on a much faster timescale.
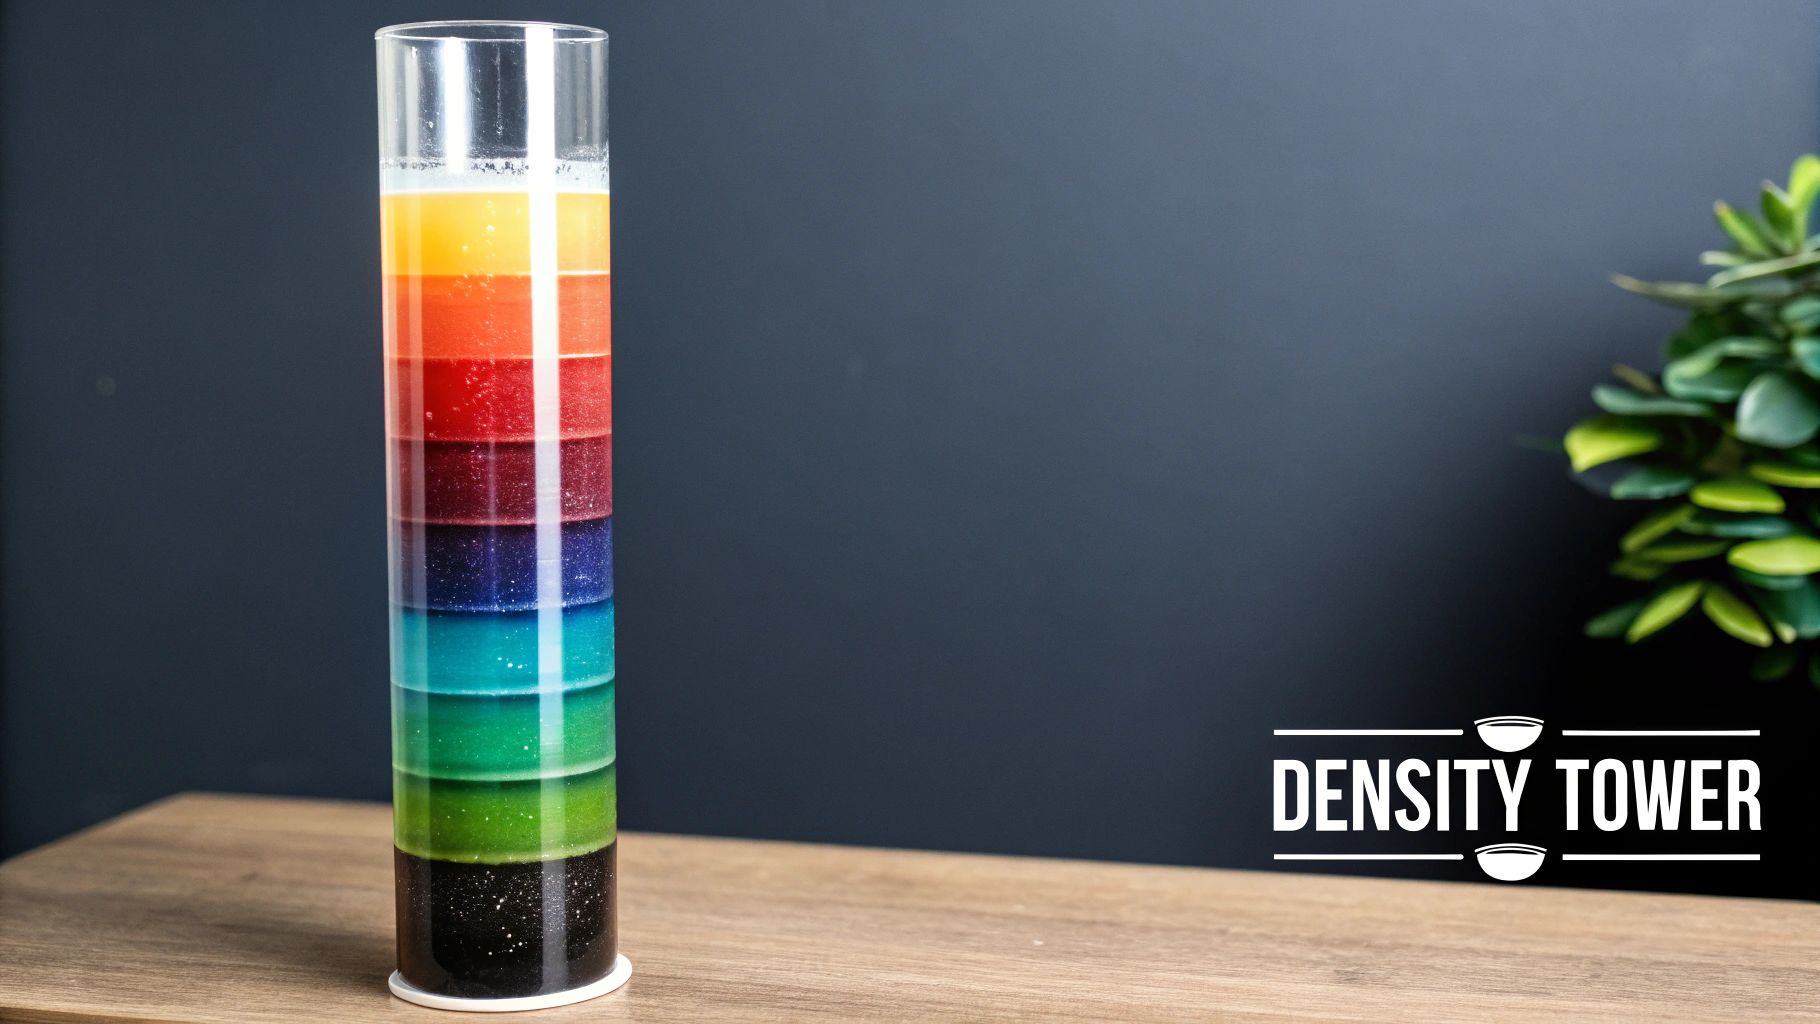
7. Density Tower (Liquid Layers)
The Density Tower is a visually stunning science experiment for kids that introduces the concept of density in a colorful and unforgettable way. This experiment involves carefully layering different liquids, like honey, dish soap, water, and oil, in a clear container. Because each liquid has a different density (basically, how “heavy” it is for its size), they separate into distinct layers instead of mixing, creating a beautiful rainbow effect.
This hands-on activity is a favorite in science lessons because it makes an abstract physics concept easy to see and understand. It teaches you about density and why some liquids don’t mix, and it also requires a steady hand, which helps with your fine motor skills.
How to Build Your Tower
To begin, you’ll need a tall, clear container like a glass or a plastic bottle, and a selection of different household liquids. A great starting lineup is honey, corn syrup, dish soap, water (with food coloring), and vegetable oil.
- Start with the Densest: Begin by pouring the densest liquid into the container first. This is usually honey or corn syrup.
- Layer Carefully: Slowly add the next liquid (e.g., dish soap) by tilting the container and pouring it down the inside wall, or by pouring it over the back of a spoon. This stops the liquids from mixing too much.
- Continue Building: Repeat the process with each liquid, working your way up from most dense to least dense. A common order is honey, corn syrup, dish soap, water, and finally, vegetable oil on top.
Pro-Tip: Add a few drops of food coloring to the water to make its layer stand out. Once your tower is complete, you can gently drop in small objects like a grape or a piece of plastic to see where they settle. This shows you their density compared to the liquids!
8. Egg Drop Challenge
The Egg Drop Challenge is a classic engineering and physics experiment that gives you a simple mission: design and build a contraption that can protect a raw egg from breaking when dropped from a height. This activity is a fantastic introduction to the engineering design process, mixing creativity with physics principles like force, momentum, and absorbing energy.
Made famous by educational programs from places like NASA, this experiment encourages you to think critically and solve problems. It’s one of the most engaging science experiments for kids because it perfectly balances hands-on building with the high-stakes suspense of the final drop, making learning both memorable and super exciting.
How to Host Your Egg Drop
Start by gathering a bunch of common household materials like straws, cotton balls, bubble wrap, tape, and cardboard. The goal is to get creative with whatever you can find.
- Design and Build: Ask your young engineers to sketch their design first. They should think about how to cushion the egg (absorption) or slow its fall (air resistance). Then, let them build their protective device around a raw egg.
- Test from a Low Height: Start by dropping the contraptions from a low height, like off a chair. This allows for initial tests and quick improvements without a big mess.
- Increase the Challenge: For the designs that work, gradually increase the drop height. See which designs work best and talk about why. Was it the cushioning, the parachute, or something else?
Pro-Tip: Emphasize that failure is a huge part of engineering! Encourage kids to analyze why a design didn’t work and what they could change. This cycle of testing and redesigning is exactly how real-world engineers solve problems, like designing safer cars.
9. pH Indicator with Red Cabbage
Transform your kitchen into a colorful chemistry lab with this awesome experiment using red cabbage. Believe it or not, red cabbage contains a special pigment called anthocyanin, which changes color depending on whether it’s in an acidic or alkaline (basic) solution. This makes it a fantastic, all-natural pH indicator, perfect for introducing the concepts of acids and bases.
This hands-on activity is one of the most visually striking science experiments for kids, as you get to create a whole spectrum of colors using everyday household stuff. It’s a safe and engaging way to explore chemistry, creating a tangible, rainbow-like result that clearly demonstrates scientific principles.
How to Create Your pH Rainbow
First, you need to get the indicator juice out of the cabbage. An adult should handle this part by chopping up a few red cabbage leaves and boiling them in water for about 10-15 minutes until the water turns a deep purple.
- Prepare the Indicator: Strain the purple juice into a jug and let it cool. This is your pH indicator.
- Set Up Your Test: Pour small, equal amounts of the cabbage juice into several clear glasses or test tubes.
- Test Your Substances: Add a few drops of different household liquids to each glass. Try lemon juice (acid), vinegar (acid), soapy water (base), or a solution of baking soda and water (base), and watch the colors change! Acids will turn it reddish-pink, while bases will turn it bluish-green.
Pro-Tip: Create a color chart by noting what color the indicator turns for things you know are acids (like vinegar) and bases (like baking soda). This helps you classify other mystery substances. You can also connect this to real-world science, like how pH is important for soil in the garden or for keeping a swimming pool clean.
10. Mentos and Diet Coke Fountain
The Mentos and Diet Coke fountain is a legendary science experiment for kids, famous for its explosive and super fun results. This isn’t a chemical reaction, but a physical one that teaches us about a process called nucleation. The rough, bumpy surface of the Mentos candy provides tons of tiny spots for the dissolved carbon dioxide gas in the Diet Coke to rapidly form bubbles, forcing the liquid out in an impressive geyser! https://www.youtube.com/embed/45X1H6MbGRY
Made famous by internet videos and shows like MythBusters, this experiment is guaranteed to create a memorable “wow” moment. It’s a fantastic way to introduce concepts like states of matter, gas pressure, and surface tension in an unforgettable and energetic way that kids absolutely love.
How to Create Your Fountain
For this experiment, you’ll need a large, clear outdoor space because this fountain can shoot several feet into the air! Safety goggles are also a good idea.
- Set the Stage: Place a 2-liter bottle of Diet Coke on a flat, stable surface on the ground. Carefully open the bottle cap.
- Prepare the Mentos: Roll a piece of paper into a tube that is just wide enough for the Mentos candies to slide through. Hold your finger over the bottom end and load 5-7 Mentos inside.
- Launch the Geyser: Place the tube directly over the mouth of the bottle. Quickly remove your finger to drop all the candies in at once, and stand back immediately to watch the eruption!
Pro-Tip: Diet Coke works best because its artificial sweeteners, combined with the lack of sticky sugar, allow bubbles to form more efficiently. To make it even more scientific, try comparing the results with regular Coke or other fizzy drinks and see which one creates the biggest fountain!
Top 10 Kids Science Experiments Comparison
| Experiment | Implementation Complexity 🔄 | Resource Requirements ⚡ | Expected Outcomes 📊 | Ideal Use Cases 💡 | Key Advantages ⭐ |
|---|---|---|---|---|---|
| Volcano Eruption (Baking Soda and Vinegar) | Low – simple mix & pour reaction | Low – common household items | Quick, dramatic foam eruption | Elementary science fairs, basic chemistry demos | Engaging, inexpensive, teaches acid-base |
| Rainbow Milk Experiment | Low – gentle drops and soap contact | Low – milk, food coloring, soap | Immediate colorful swirling patterns | Early science education, visual molecular concepts | Visually stunning, safe, multiple concepts |
| Invisible Ink with Lemon Juice | Medium – requires drying & heat | Low – lemon juice, paper, heat | Hidden message revealed by heating | History-themed learning, creativity with chemistry | Natural materials, connects science & history |
| Walking Water Experiment | Low – setup glasses with colored water | Low – water, food coloring, towels | Slow color mixing and water movement | Fluid dynamics, color theory education | Visual, safe, teaches plant capillary action |
| Static Electricity Balloon Experiments | Low – rubbing balloons on fabric | Low – balloons, fabric, small items | Immediate static effects like attraction/repulsion | Introductory physics, interactive demonstrations | Multiple variations, fun, tactile learning |
| Crystal Growing Experiment | High – requires days/weeks patience | Medium – salts/sugar, jars, hot water | Long-term crystal formation, molecular insight | Extended science projects, geology lessons | Produces lasting specimens, teaches crystallization |
| Density Tower (Liquid Layers) | Medium – careful layering needed | Medium – several liquids, container | Colorful stable liquid layers showing density | Physics teaching, science fairs | Visually impressive, teaches density & buoyancy |
| Egg Drop Challenge | Medium – design & testing iterations | Medium – eggs, cushioning materials | Protected egg from impact | Engineering design, problem-solving competitions | Engaging, promotes creativity and engineering |
| pH Indicator with Red Cabbage | Medium – preparation and testing steps | Low – cabbage, household chemicals | Color changes showing acidity/basicity | Chemistry labs, cooking science | Natural indicator, colorful, practical chemistry |
| Mentos and Diet Coke Fountain | Low – simple setup with safety cautions | Low – soda, Mentos, outdoor space | Rapid, spectacular soda fountain eruption | Large group demos, viral science shows | Dramatic, memorable, quick reaction |
Your Mission Isn’t Over Yet, Young Scientist!
Congratulations on completing your scientific explorations! You’ve successfully navigated an awesome journey through chemistry, physics, and engineering, all from your own home or classroom. From the explosive reaction of a volcano to the mind-bending physics of a density tower, you’ve done more than just follow instructions; you’ve acted like a real scientist.
Each of these science experiments for kids was designed to be a launchpad for your curiosity. You’ve witnessed firsthand how acids and bases react, discovered the rules of surface tension with rainbow milk, and engineered a device to save an egg. These aren’t just one-off magic tricks; they are powerful demonstrations of the fundamental rules that run our universe. The most important tool you used wasn’t the vinegar or the balloons, but your own awesome, inquisitive mind.
From Playful Mess to Powerful Knowledge
The real magic of these experiments is in the process, not just the cool result. Think back to the Egg Drop Challenge. Whether your egg survived or ended up as scrambled evidence, the real learning happened when you were designing, building, and trying to improve your contraption. That cycle of thinking, testing, and improving is the very heart of science and engineering.
Similarly, when you used red cabbage to test different liquids, you were practicing the same skills that professional chemists use in their labs. You learned that science isn’t about having all the answers right away; it’s about knowing how to ask good questions and how to find the answers for yourself. This hands-on approach builds resilience, critical thinking, and a real passion for discovery.
What’s Your Next Big Discovery?
The journey of a scientist never truly ends. The world around you is packed with mysteries just waiting to be solved. Use the ideas you’ve learned here to fuel your future investigations.
- Observe Your World: Why do leaves change color in the fall? How does a spider build its web? Keep a notebook handy to jot down your questions.
- Form a Hypothesis: Take an educated guess! A hypothesis is just your best prediction. For example, “I think plants will grow taller if they get more sunlight.”
- Design Your Own Experiment: How could you test your idea? You could place one plant in a sunny window and another in a shady corner, making sure to give them the same amount of water, and see what happens!
By thinking like this, you turn everyday life into one big science experiment. Your backyard can become a biology lab and your toy box a center for engineering. Keep asking “why” and “how,” and never stop being curious. Your next great adventure is just one question away.
Ready to take your scientific curiosity to the final frontier? Continue your mission with Space Ranger Fred! Our adventure kits are packed with more thrilling hands-on experiments designed to make learning about space and science an unforgettable journey. Explore the universe and beyond by visiting Space Ranger Fred today
Article created using Outrank